In this blog we ‘ll learn about spring boot 3 security. Spring boot 3 uses the java 17 version by default, So if you are using any older version please migrate to java 17 version for this example. We know that security is the main feature in every application. We ‘ll not share any data from our application if the user is not valid. So before moving to the spring boot security we have to understand two terms Authentication & Authorization.
Authentication
Authentication means authenticate that you are the actual user by providing your credentials like username and password. So Authentication expect these two parameters username and password and check in the database. If the credentials match that means it’s an authentic user. But if credentials donot match means it is not a valid user.
Authorization
Authorization means that you are authorized to access the secured resource. For example we have two endpoints one for HR department information and one for Security department information. So if anyone have HR role he can access the HR department information but can’t access the Security department information. Same with if anyone have Security role he can access the Security department information but can’t see the HR department information.
If you are just looking for code you can directly jump into the GitHub Code.
Spring security feature we cover in this blog
In this blog we ‘ll cover the spring security basic authentication feature. We ‘ll create a project in which we ‘ll see how to authenticate user using spring security and allow access to shared resource on the basis of valid roles. And on the next blog we ‘ll learn about most advance feature of spring boot security JWT. JWT stands for JSON Web Token. JWT is use for stateless application. We ‘ll cover that in more depth in our next blog.
Let’s start now and see how we can use spring boot security to authenticate and allow access to protected resource for valid roles only.
Before moving to that example we must know that spring boot provides built-in support for security using spring security starter. We just have to add the spring-boot-starter-security dependency in our pom.xml file and it ‘ll automatically secure all the endpoints of our application. So if you create any endpoint in your spring boot application after adding this dependency, If you try to access the endpoint a login page ‘ll come where you have to provide the username and password.
Let’s see it using an example. Just create a spring boot application and add this spring-boot-starter-security dependency in the pom.xml file. We are creating spring boot project using https://start.spring.io/. You can create either from your IDE or can follow the same step that we are performing.
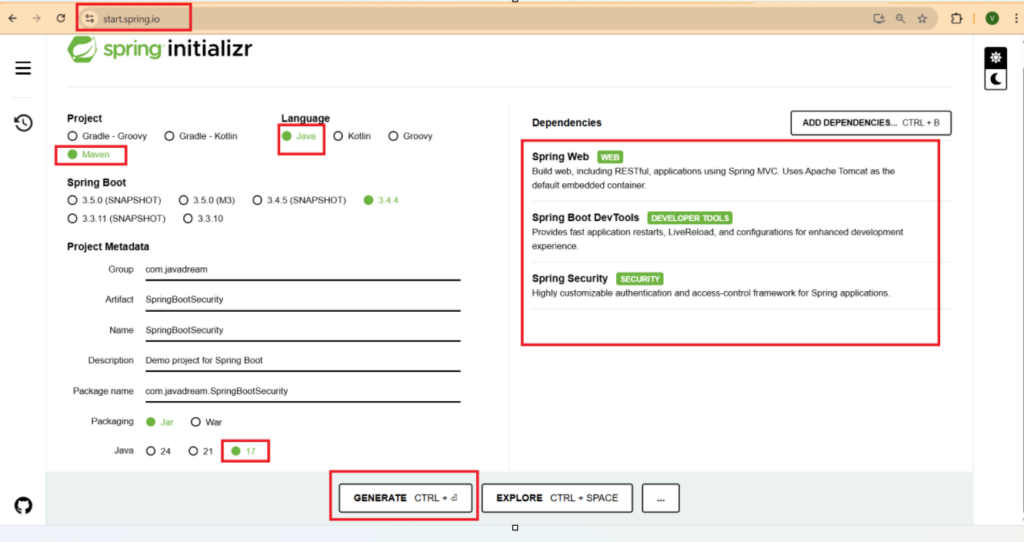
Project Structure

So we have created the spring boot project. We are using java 17 here with spring boot 3. We have already added the spring-boot-starter-security dependency while we were creating the project. So spring already add built-in support for security due to this dependency. You can see your pom.xml file and see this security dependency is there.
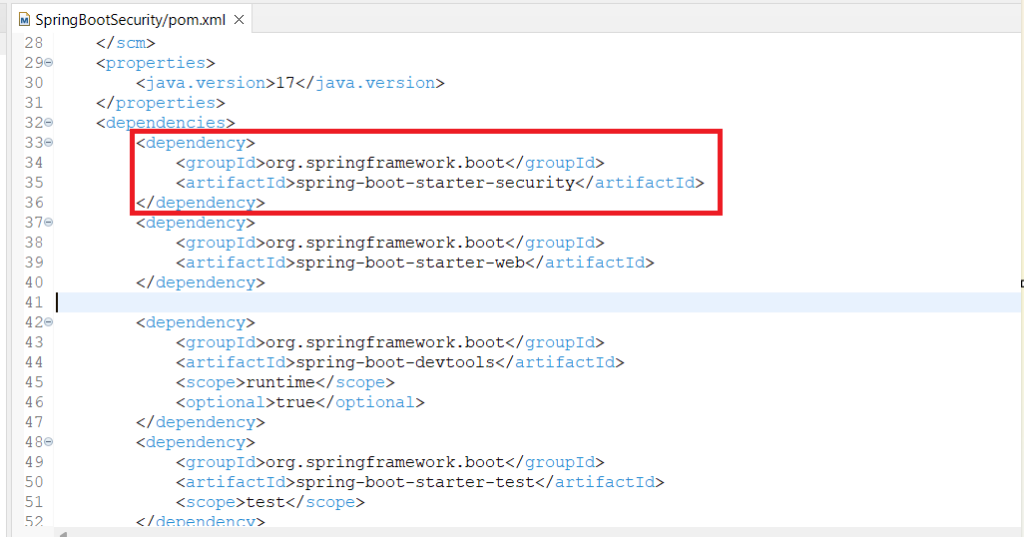
So it’s time to validate that spring boot provides built-in support for security after adding this dependency. To validate this we ‘ll create a GET endpoint and try to return a simple string from that endpoint. After running the application when we ‘ll try to access this endpoint from our browser we ‘ll see that a form ‘ll popup and ask for username and password. Let’s create the endpoint and see this in practical.
Create a controller class to expose a dummy rest endpoint to validate the security feature. We are creating JavadreamController.java class and exposing the dummy endpoint.
JavadreamController.java
package com.javadream.SpringBootSecurity.controller;

import org.springframework.web.bind.annotation.GetMapping;
import org.springframework.web.bind.annotation.RestController;

@RestController
public class JavadreamController {


	@GetMapping("/dummy")
	public String dummy() {
		return "You are learning Spring boot security from Javadream";
	}
}Code language: CSS (css)
Now run your application. As we have added the spring-boot-starter-security dependency. So when we running our application default password ‘ll be printed on our console. We have to use this password to access our endpoint. Just run your application and see the console logs.
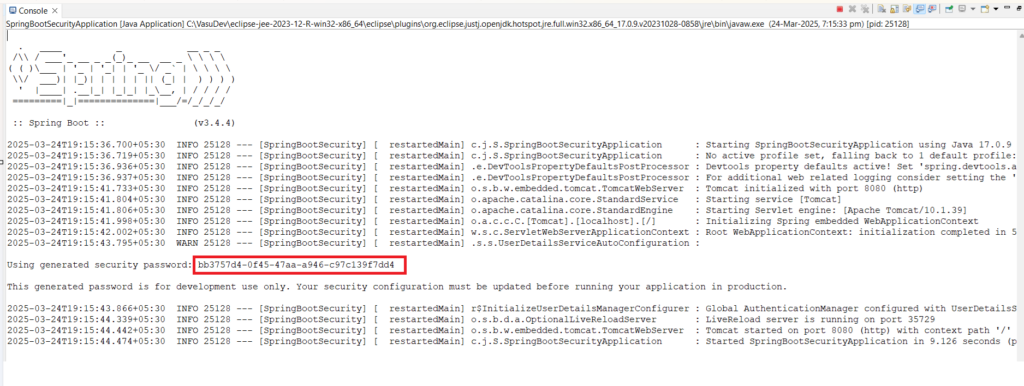
See the highlighted part it’s the default password. It changes ever time if you re-run your application. So after application start just try to access the endpoint that we created. As we created a GET endpoint let’s call this from the browser.
In your browser when you type the endpoint URL it ‘ll redirect you to the /login URL. In our case our endpoint URL is http://localhost:8080/dummy. When we hit enter it ‘ll redirect us to http://localhost:8080/login URL. And you ‘ll see a login form there. This form is provided by spring boot basic security feature by default.

By default username is user and on password field you have to paste the same password that was printed on console at the time of running our application


This is the browser behavior. But suppose if you are using in client software like Postman to test your application. So when you call this API you ‘ll get the 401 status code.
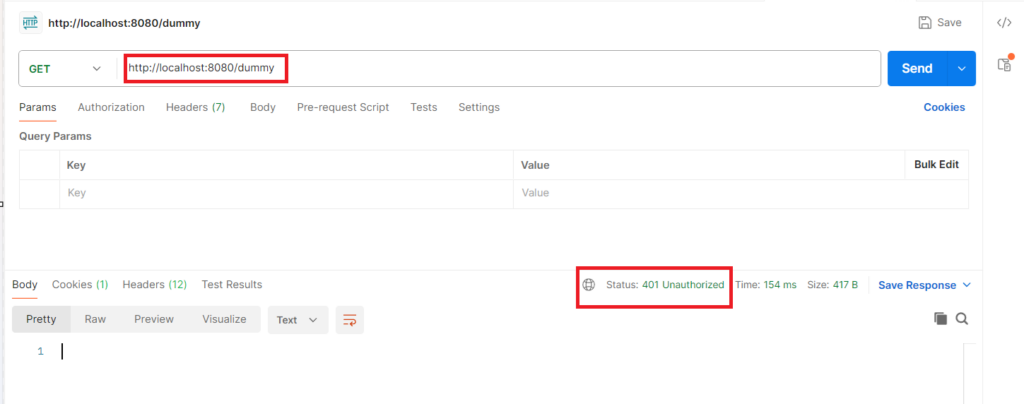
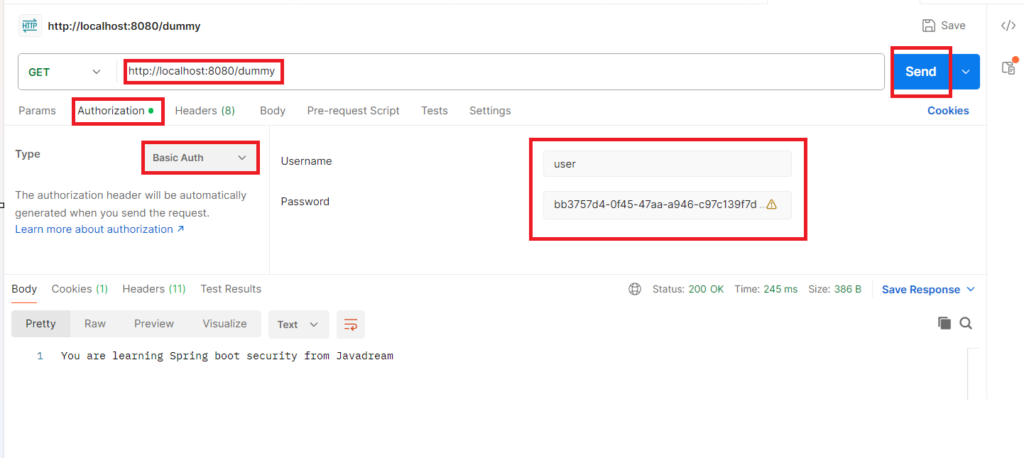
To access this API from postman you have to use the same credentials. Username is user and password is the same that was printed on console screen. Go to the Authorization tab on your postman and select the type as Basic Auth. You ‘ll get the same username and password field. Just put the value there and call the API you ‘ll get the result.
If you are till here with us means you have basic understanding of spring boot security along with a running project. Let’s explore more
Spring boot security authentication and authorization
Now we ‘ll see the example of authentication and authorization. We ‘ll create the same example that we explain above. We ‘ll create two endpoints one for HR department and other for security department. And on the basis of Role we ‘ll consume the responses from these endpoints. Spring boot supports multiple authentication method like In-memory, JDBC, LDAP, OAuth2, JWT etc. and for authorization it supports Role-based and method-level security.
Let’s start the coding and see this things in practical.
Project Structure

We ‘ll use the same project that we created above. As we are going to use database for authentication we need to add the JPA related dependency in our pom.xml file. For this example we are going to use PostgreSQL database. You can choose any database of your choice logic remains same. And if you want to use same database PostgreSQL and not have much context about this. You can follow our blog Spring boot integration with PostgreSQL and get the in-depth knowledge before moving to this example.
We are using the same project and security dependency we have already added there. Now we are going to use PostgreSQL we have to add below dependency also in our pom.xml file.
<dependency>
  <groupId>org.springframework.boot</groupId>
  <artifactId>spring-boot-starter-data-jpa</artifactId>
</dependency>

<dependency>
  <groupId>org.postgresql</groupId>
  <artifactId>postgresql</artifactId>
  <scope>runtime</scope>
</dependency>Code language: HTML, XML (xml)
Above dependency is for the JPA and PostgreSQL. If you are using any other database you can remove this PostgreSQL dependency and use the dependency for the database that you are going to use.
Now we have to create a schema in postgreSQL database. In this example we are creating schema name as jwt.
Create database schema in PostgreSQL


You can see we have created the schema in our PostgreSQL database. So whatever table we ‘ll be creating for this example ‘ll come inside this schema.
Schema has been created now we need to add some tables to this schema. We ‘are ‘ll be creating three tables appuser, roles, user_roles. appuser table stores the credentials of the user. roles table stores the name of all the roles. Third and last table is user_roles which contains the details of user and role association. Sharing the screenshot of the tables for your reference along with the data that we use.


We have created the schema in PostgreSQL. Now we have to add the database configuration in our applications.properties file. Open the properties file and paste below configurations there.
spring.application.name=SpringBootSecurity

# PostgreSQL Configuration
spring.datasource.url=jdbc:postgresql://localhost:5432/javadream?currentSchema=jwt
spring.datasource.username=postgres
spring.datasource.password=postgres

# JPA Configuration
spring.jpa.properties.hibernate.dialect=org.hibernate.dialect.PostgreSQLDialect
spring.jpa.hibernate.ddl-auto=update
spring.jpa.show-sql=true
spring.jpa.hibernate.naming.physical-strategy=org.hibernate.boot.model.naming.PhysicalNamingStrategyStandardImpl
Code language: PHP (php)
For getting details description of these properties you can follow our blog Spring boot integration with PostgreSQL. Here we are just targeting on the spring security. If you want to know any specific thing related to PostgreSQL you can follow this blog we cover everything in details.
Entity Class
As we mentioned above we need to create three tables for user and role associations. We ‘ll create that class using the JPA entity. Let’s start coding create the entity class for creating table.
package com.javadream.SpringBootSecurity.model;

import java.util.Set;

import jakarta.persistence.Column;
import jakarta.persistence.Entity;
import jakarta.persistence.FetchType;
import jakarta.persistence.GeneratedValue;
import jakarta.persistence.GenerationType;
import jakarta.persistence.Id;
import jakarta.persistence.JoinColumn;
import jakarta.persistence.JoinTable;
import jakarta.persistence.ManyToMany;
import jakarta.persistence.Table;

@Entity
public class AppUser {

	@Id
	@GeneratedValue(strategy = GenerationType.IDENTITY)
	private Long id;

	@Column(nullable = false, unique = true)
	private String username;

	@Column(nullable = false)
	private String password;

	private boolean enabled = true;

	@ManyToMany(fetch = FetchType.EAGER)
	@JoinTable(name = "user_roles", joinColumns = @JoinColumn(name = "user_id"), inverseJoinColumns = @JoinColumn(name = "role_id"))
	private Set<Role> roles;

	public AppUser() {
		super();
	}

	public AppUser(Long id, String username, String password, boolean enabled, Set<Role> roles) {
		super();
		this.id = id;
		this.username = username;
		this.password = password;
		this.enabled = enabled;
		this.roles = roles;
	}

	public Long getId() {
		return id;
	}

	public void setId(Long id) {
		this.id = id;
	}

	public String getUsername() {
		return username;
	}

	public void setUsername(String username) {
		this.username = username;
	}

	public String getPassword() {
		return password;
	}

	public void setPassword(String password) {
		this.password = password;
	}

	public boolean isEnabled() {
		return enabled;
	}

	public void setEnabled(boolean enabled) {
		this.enabled = enabled;
	}

	public Set<Role> getRoles() {
		return roles;
	}

	public void setRoles(Set<Role> roles) {
		this.roles = roles;
	}

}Code language: JavaScript (javascript)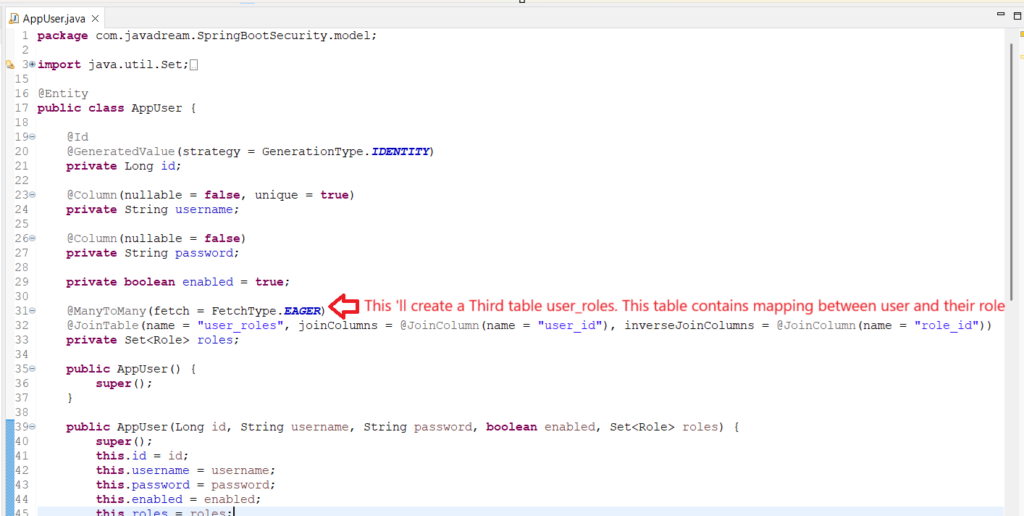
package com.javadream.SpringBootSecurity.model;

import jakarta.persistence.Column;
import jakarta.persistence.Entity;
import jakarta.persistence.GeneratedValue;
import jakarta.persistence.GenerationType;
import jakarta.persistence.Id;

@Entity
public class Role {

	@Id
	@GeneratedValue(strategy = GenerationType.IDENTITY)
	private Long id;

	@Column(nullable = false, unique = true)
	private String name;

	public Role() {
		super();
	}

	public Role(Long id, String name) {
		super();
		this.id = id;
		this.name = name;
	}

	public Long getId() {
		return id;
	}

	public void setId(Long id) {
		this.id = id;
	}

	public String getName() {
		return name;
	}

	public void setName(String name) {
		this.name = name;
	}

}Code language: JavaScript (javascript)
Controller for exposing endpoints
Let’s create another controller and expose some endpoints to validate our example. In this controller class we ‘ll expose four endpoints. One is open for all it ‘ll be public anyone can access this endpoint. second one is only for HR department. This endpoint can be access only by the user who ‘ll have HR role if any other user trying to access this they ‘ll get forbidden 403 error code. Third endpoint we ‘ll expose for security department. This end point can be access only by the user with having associated with SECURITY role. Fourth and the last one is the endpoint that can be access by both the users having HR or SECURITY role. Below are the endpoints details.
/api/public/hello
/api/hr/information
/api/security/information
/api/userCode language: PHP (php)
Below is the controller class that is exposing above endpoints.
package com.javadream.SpringBootSecurity.controller;

import org.springframework.web.bind.annotation.GetMapping;
import org.springframework.web.bind.annotation.RequestMapping;
import org.springframework.web.bind.annotation.RestController;

@RestController
@RequestMapping("/api")
public class AuthController {


    @GetMapping("/public/hello")
    public String publicHello() {
        return "This is the Public endpoint It can be access without any authentication and authorization.";
    }

    @GetMapping("/hr/information")
    public String hrInfo() {
        return "Hello, You are authorized to get HR department information";
    }

    @GetMapping("/security/information")
    public String securityInfo() {
        return "Hello, You are authorized to get Security department information";
    }

    @GetMapping("/user")
    public String userInfo() {
        return "Hello, Any user with Role HR or Security can access this endpoint";
    }
}Code language: CSS (css)
Repository for DB interaction
We have to create a repository interface that ‘ll help us to interact with the database. It extends the JpaRepository interface from spring jpa. We ‘ll create a method here to get user details from the database. Below is the code for this repository.
package com.javadream.SpringBootSecurity.repository;

import java.util.Optional;

import org.springframework.data.jpa.repository.JpaRepository;
import org.springframework.stereotype.Repository;

import com.javadream.SpringBootSecurity.model.AppUser;

@Repository
public interface UserRepository extends JpaRepository<AppUser, Long> {
	Optional<AppUser> findByUsername(String username);
}Code language: CSS (css)
Service class for authenticate user
We have created controller as well as repository. Now we have to create a service class where we perform the authentication of the user. In this service class we are extending the UserDetailsService interface from spring security. This interface plays an important role to authenticate the user. It helps to retrieve the data that is related to user like username, password, and authorities/roles. We are overriding the loadUserByUsername method of this interface. Let’s see the code of the service class.
package com.javadream.SpringBootSecurity.service;

import org.springframework.security.core.userdetails.UserDetails;
import org.springframework.security.core.userdetails.UserDetailsService;
import org.springframework.security.core.userdetails.UsernameNotFoundException;
import org.springframework.stereotype.Component;

import com.javadream.SpringBootSecurity.repository.UserRepository;

@Component
public class CustomUserDetailsService implements UserDetailsService {

	private final UserRepository userRepository;

	public CustomUserDetailsService(UserRepository userRepository) {
		super();
		this.userRepository = userRepository;
	}

	@Override
	public UserDetails loadUserByUsername(String username) throws UsernameNotFoundException {
		return userRepository.findByUsername(username)
                .map(CustomUserDetails::new)
                .orElseThrow(() -> new UsernameNotFoundException("User not found"));
	}

}Code language: JavaScript (javascript)
If you see in this service class we are using the CustomUserDetails class. In this class we implemets the UserDetails interface from spring security. This interface helps in getting the user details while doing the authentication and authorization. This interface is use to encapsulate user credentail along with their authority after they retrieved by UserDetailsService interface. Let’s see this class code.
package com.javadream.SpringBootSecurity.service;

import java.util.Collection;
import java.util.stream.Collectors;

import org.springframework.security.core.GrantedAuthority;
import org.springframework.security.core.userdetails.UserDetails;

import com.javadream.SpringBootSecurity.model.AppUser;

public class CustomUserDetails implements UserDetails {

	private final AppUser user;

	public CustomUserDetails(AppUser user) {
		this.user = user;
	}

	@Override
	public Collection<? extends GrantedAuthority> getAuthorities() {
		return user.getRoles().stream().map(role -> (GrantedAuthority) () -> "ROLE_" + role.getName())
				.collect(Collectors.toSet());
	}

	@Override
	public String getPassword() {
		return user.getPassword();
	}

	@Override
	public String getUsername() {
		return user.getUsername();
	}

	@Override
	public boolean isAccountNonExpired() {
		return true;
	}

	@Override
	public boolean isAccountNonLocked() {
		return true;
	}

	@Override
	public boolean isCredentialsNonExpired() {
		return true;
	}

	@Override
	public boolean isEnabled() {
		return user.isEnabled();
	}
}Code language: PHP (php)
Security Configuration
Last and most important feature of spring security is it’s configuration this is the last step in our example. In the start of this blog we saw that spring add built-in support for security by adding only security dependency. That secure each and every request endpoint of our application. But we don’t that behavior. We want some endpoints to be open so that anyone can access that. and other endpoint can be access only if user is authenticated and have a valid role to access particular endpoint. So for this we need to modify spring security feature. We ‘ll create a configuration class and modify the default behavior. Follow the below class for reference.
package com.javadream.SpringBootSecurity.config;

import org.springframework.context.annotation.Bean;
import org.springframework.context.annotation.Configuration;
import org.springframework.security.authentication.AuthenticationManager;
import org.springframework.security.config.Customizer;
import org.springframework.security.config.annotation.authentication.configuration.AuthenticationConfiguration;
import org.springframework.security.config.annotation.web.builders.HttpSecurity;
import org.springframework.security.crypto.bcrypt.BCryptPasswordEncoder;
import org.springframework.security.crypto.password.PasswordEncoder;
import org.springframework.security.web.SecurityFilterChain;

import com.javadream.SpringBootSecurity.service.CustomUserDetailsService;

@Configuration
public class SecurityConfig {

	private final CustomUserDetailsService userDetailsService;

	public SecurityConfig(CustomUserDetailsService userDetailsService) {
		super();
		this.userDetailsService = userDetailsService;
	}

	@Bean
	public SecurityFilterChain securityFilterChain(HttpSecurity http) throws Exception {
		http.csrf(csrf -> csrf.disable())
				.authorizeHttpRequests(auth -> auth.requestMatchers("/api/public/**").permitAll()
						.requestMatchers("/api/hr/**").hasRole("HR")
						.requestMatchers("/api/security/**").hasRole("SECURITY")
						.requestMatchers("/api/user/**").hasAnyRole("HR", "SECURITY").anyRequest().authenticated())
				.httpBasic(Customizer.withDefaults());
		return http.build();
	}

	@Bean
	public PasswordEncoder passwordEncoder() {
		return new BCryptPasswordEncoder();
	}

	@Bean
	public AuthenticationManager authenticationManager(AuthenticationConfiguration configuration) throws Exception {
		return configuration.getAuthenticationManager();
	}
}Code language: JavaScript (javascript)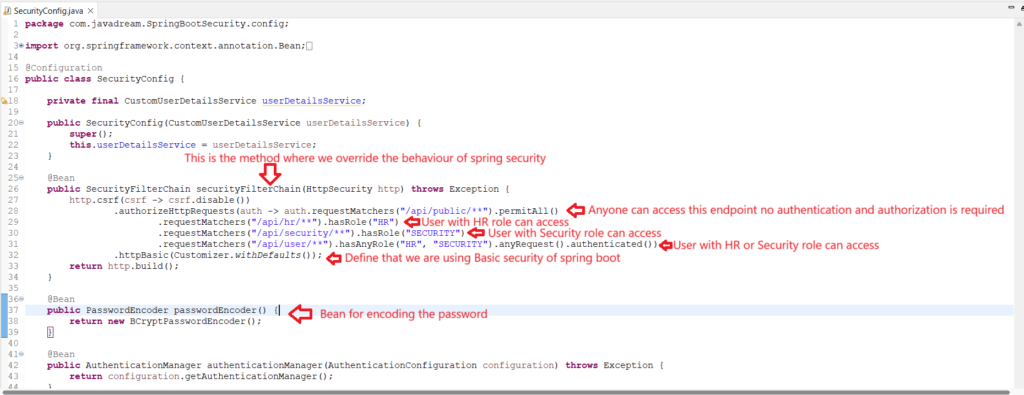
We are done with all the necessary steps. It’s time to run our application. Just run your application and once your tomcat up and running. Check your PostgreSQL console and see if that three table are created or not. As we created the JPA entity class so once our application started they ‘ll automatically created just check and verify.

These tables are empty. Run below command on your PostgreSQL console to put some data into these tables.
INSERT INTO appuser (id, enabled, password, username) VALUES (1, true, '$2a$10$wQ6Ge8dxAzl59aNgYZjoMe4Td0UVZwjbEirw4qwwjgmJJiWt9RPR.',
'javadream_hr_user');
INSERT INTO appuser (id, enabled, password, username) VALUES (2, true, '$2a$10$voCIn7s3KYA2oY7jpgZvMuJdBiuXu6LegFPQt3eePUjcjpNm2MvM2',
'javadream_security_user');

INSERT INTO role (id, name) VALUES (1, 'HR');
INSERT INTO role (id, name) VALUES (2, 'SECURITY');

INSERT INTO user_roles (user_id, role_id) VALUES (1, 1);
INSERT INTO user_roles (user_id, role_id) VALUES (2, 2);Code language: JavaScript (javascript)
Now we have data in our tables. It’s time to validate this example. We ‘ll test all four endpoints that we exposed. Let’s test one by one.
NOTE: We created two entry in appuser table. If you see the password field. The value in this field is not the actual password it’s the string that is encoded. This is the best practice, We must not save password in plain text use BCryptPasswordEncoder to encode your password and save . Below are the credential for both the users.
username- javadream_hr_user
password- 12345

username- javadream_security_user
password- 123456
Testing Endpoints
From SecurityConfig class you get the context like which endpoint is accessible for which role. We have define the configuration in that class. It’s time to validate that our configuration is right or not so let’s start the testing of these endpoints.
First endpoint is /api/public/hello. This is the public endpoint anyone can access it without authenticate themself. Let’s test this endpoint via postman.
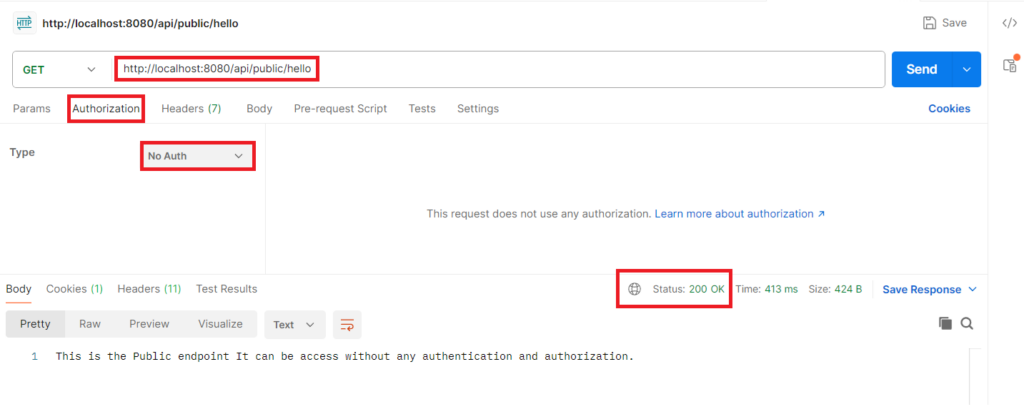
Second endpoint is /api/hr/information. Any user that has HR role can access this endpoint. Any other role ‘ll not allowed. Let’s see we have user with HR role. Let’s try to call this endpoint by providing this user credential.
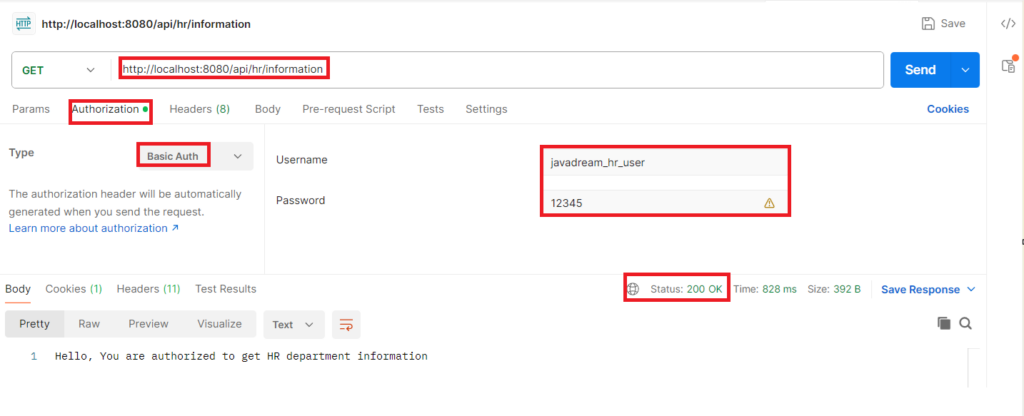
This is the valid user with HR role so he is able to get the response. Let’s try to access this endpoint with other user that has SECURITY role. As this user doesn’t have valid role it should get 403 forbidden error.
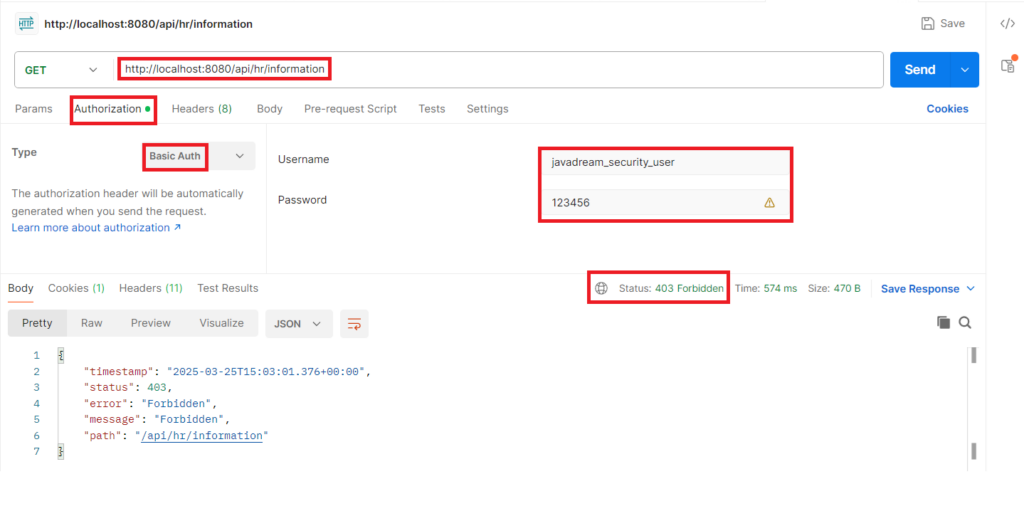
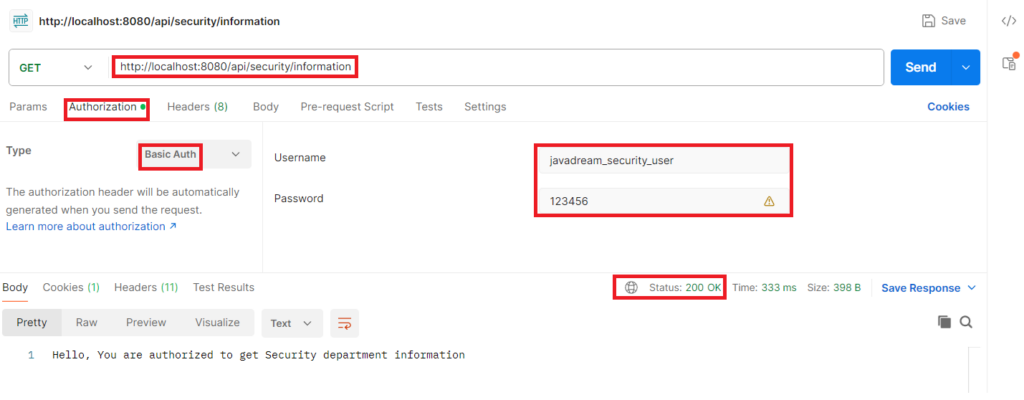
Third endpoint is /api/security/information. The users with SECURITY role can access this endpoint. We have our javadream_security_user that is associated with SECURITY role. Let’s try to call this endpoint by providing this user credential. It’s the valid user so it should get the response from this endpoint.
If we try with any other user that do not have SECURITY role must get 403 forbidden error.
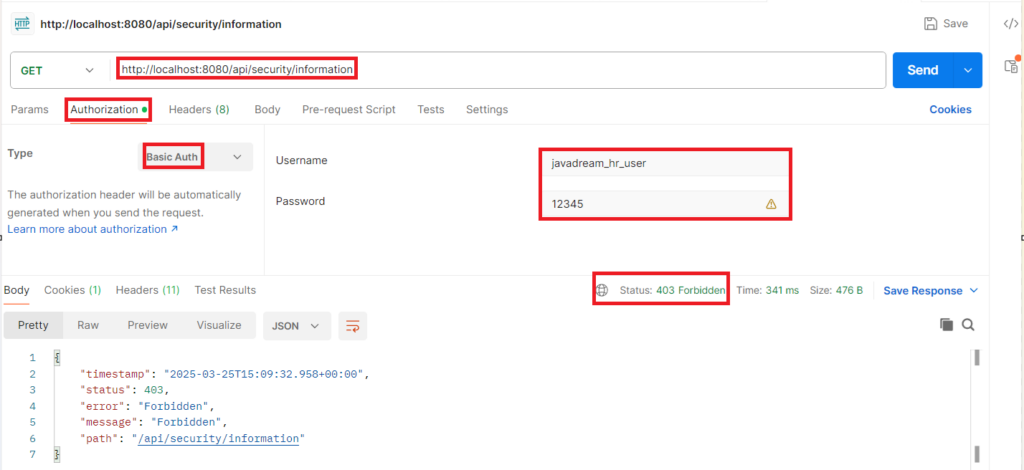
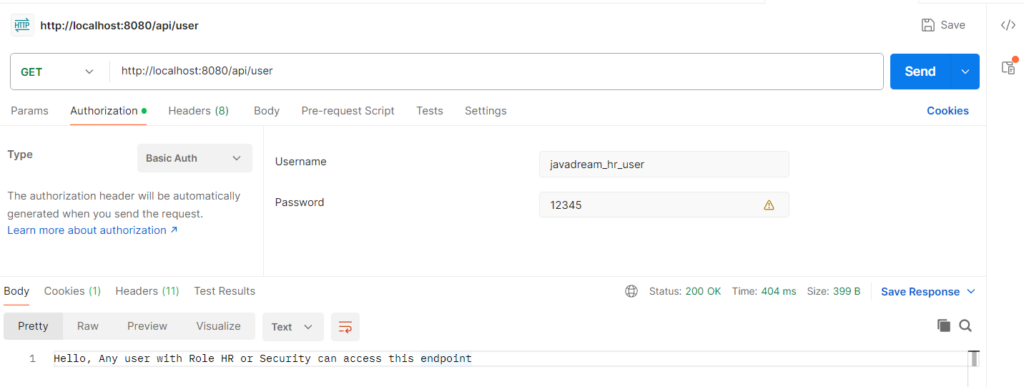
Fourth and last endpoint is /api/user. Any user that has SECURITY or HR role can access this endpoint.
Download Code
You can download the complete code from GitHub Code.
Other blogs you may like