In this blog we ‘ll learn about Redis cache spring boot integration. We know that cache plays very important role in the application performance. Spring boot can supports multiple type of cache providers. Below are some of the cache providers that we can use with spring boot application.
- Redis
- Hazelcast
- Caffeine
- EhCache
- Memcached
Install Redis on windows
There are many ways to install Redis on windows system, Some of them defined below. Please choose as per your comfort
- Install Redis by enabling the WSL (Windows Subsystem for Linux) on windows.
- Using Docker
- Install zip version
You can choose any way as per your comfort zone. The easiest way is the last one install zip version of Redis. We ‘ll follow this last way.
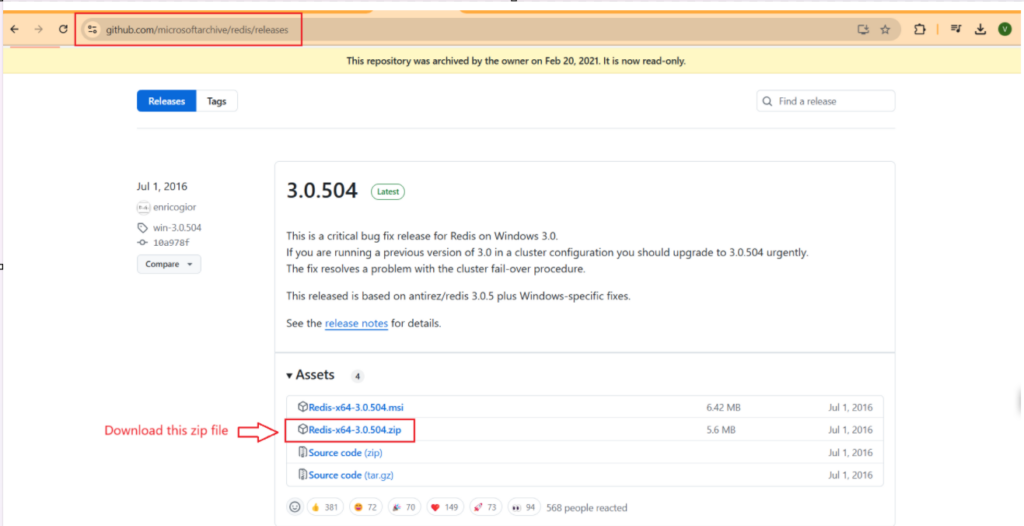
- So for installing zip version of Redis Server go to the URL Download Redis zip.
- Download the zip file.
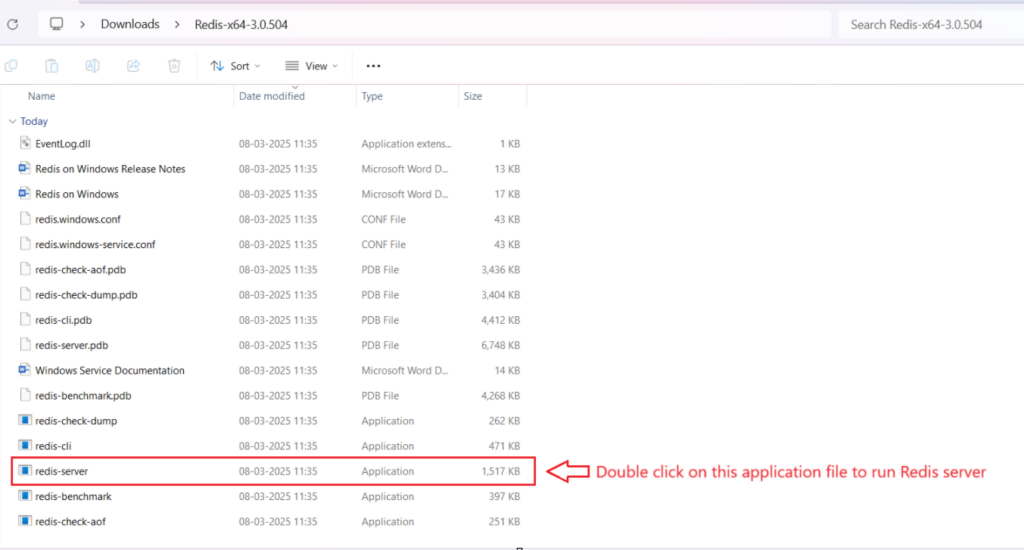
- After download extract this zip file folder.
- Double click on redis-server to run Redis server.
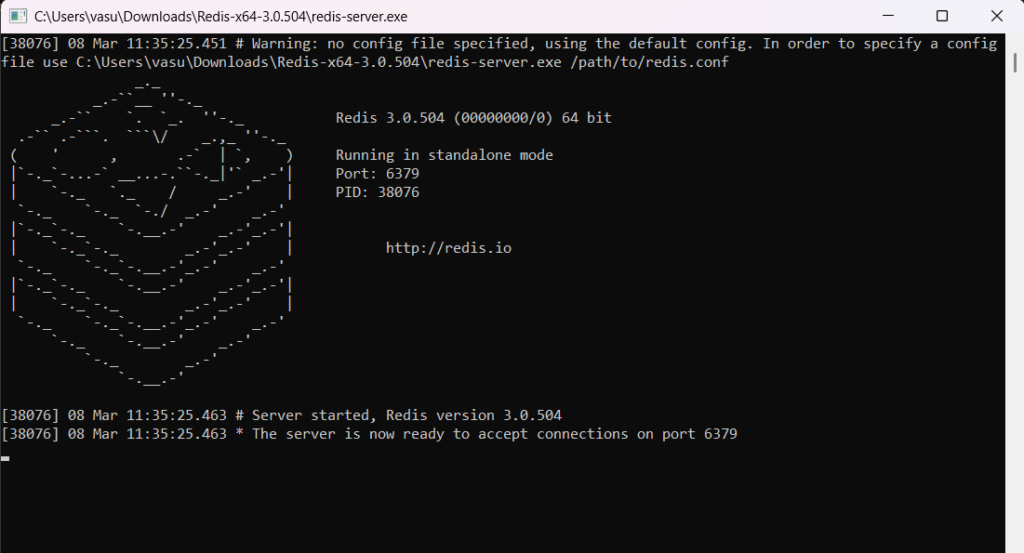
- You ‘ll see the Redis server running.
- After redis-server running now run the redis-cli. redis-cli is redis client where you can test any redis commands.
- Double click on redis-cli. and type the PING command. If in response you got PONG means you are good to use redis cache.



Redis is an in-memory cache. Due to in-memory its very fast and enhance spring boot application performance. Redis can also be use as real-time database. Redis is fast due to in-memory, because it keeps data in RAM that helps in quick read and write operations. Till here we have installed Redis server now let’s see how can we use Redis cache in spring boot application.
Spring boot integration with Redis Cache
Now it’s time to do our hands dirty. We ‘ll see how can we perform Redis cache spring boot integration. Let’s create a spring boot project and use the Redis cache. Spring boot provide built-in support for cache using @cacheable annotation. There are some other annotations as well so let’s have some understanding of these annotations. Follow the below table for cache annotations understanding.
| Annotation | Description |
| @EnableCaching | Use this on main class of spring boot project. It enable spring cache mechanism. |
| @Cacheable | It cached the result data of method. |
| @CachePut | It is used for updating the cache data. |
| @CacheEvict | It is used for removing the cache data. |
| @Caching | It combine the multiple cache annotations. Below are the annotations list that combined @Cacheable @CachePut @CacheEvict |
| @CacheConfig | This use at class level. It helps us to define common cache settings. |
| @RedisHash | It helps to map entity to Redis hash |
Above are some common annotations that we use. Let’s start coding.
Create Spring boot project
Now it’s time to start coding and see the benefits of using Redis cache in spring boot application. Let’s create a spring boot project. We are creating using start.spring.io. You can create either from your IDE or you can follow the same process.
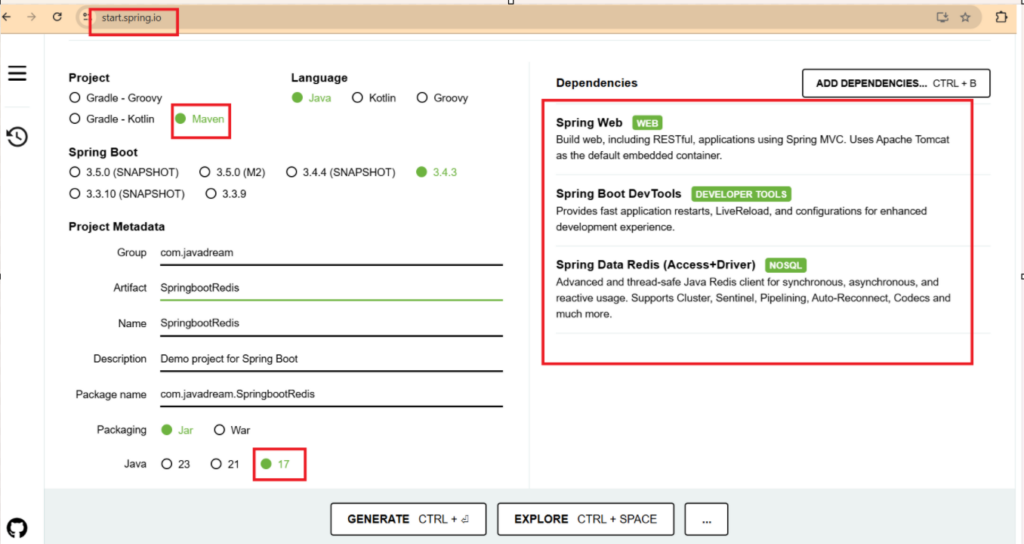
Dependency in pom file
<dependency>
  <groupId>org.springframework.boot</groupId>
  <artifactId>spring-boot-starter-data-redis</artifactId>
</dependency>

<dependency>
  <groupId>org.springframework.boot</groupId>
  <artifactId>spring-boot-starter-web</artifactId>
</dependency>

<dependency>
  <groupId>org.springframework.boot</groupId>
  <artifactId>spring-boot-devtools</artifactId>
  <scope>runtime</scope>
  <optional>true</optional>
</dependency>Code language: HTML, XML (xml)
In this example we ‘ll use the HashMap to store details about students. We are using HashMap for time saving you can use any database of your choice. If you don’t know how to use database in spring boot application. You can look our blogs on Spring boot with H2 database and Spring boot with PostgreSQL database for better understanding.
Project Structure

Explanation about functionality
In this example we ‘ll use a HashMap to store student information like student roll Number and student name. On the application startup we ‘ll fill some data in this hash map and later we ‘ll see how can we cache this HashMap data in Redis.
You are free to use any database. For just time saving we are using hash map. Functionality remains same, only change is instead fetching data from database we ‘ll fetch data from the hash map.
And we also look for some basic Redis commands that helps us to identify details in Redis cli. It helps us to identify that we are going in right directions and data is caching successfully.
Spring boot Redis cache integration
It’s very easy to use Redis cache in spring boot application. Most of the part you have already covered like understanding of Redis annotations. Redis-server and redis-cli overview. Now you just have to follow some basic steps to use redis cache in spring boot application.
- Add Redis Starter dependency in pom.xml file.
- Add Redis configuration in applications.properties or applications.yml file.
- Enable caching by annotating main class using @EnableCaching annotation.
- Create a service class and use Redis cache annotations as per your requirements.
- Create a controller class for exposing endpoints and test the application.
Add Redis Starter dependency in pom.xml file
<dependency>
  <groupId>org.springframework.boot</groupId>
  <artifactId>spring-boot-starter-data-redis</artifactId>
</dependency>Code language: HTML, XML (xml)
Add Redis configuration in applications.properties or applications.yml file
applications.properties
spring.cache.type=redis
spring.redis.host=localhost
spring.redis.port=6379
spring.data.redis.time-to-live=600000
Enable caching by annotating main class using @EnableCaching annotation.
package com.javadream.SpringbootRedis;

import org.springframework.boot.SpringApplication;
import org.springframework.boot.autoconfigure.SpringBootApplication;
import org.springframework.cache.annotation.EnableCaching;

@SpringBootApplication
@EnableCaching
public class SpringbootRedisApplication {

	public static void main(String[] args) {
		SpringApplication.run(SpringbootRedisApplication.class, args);
	}

}Code language: JavaScript (javascript)
That’s it look how easy it is. We just added dependency in our pom.xml file and add some basic properties for cache in applications.properties file. Now after annotating your main class with @EnableCaching annotation, if you run your project it ‘ll run successfully.
The last step pending is we have to create a service class and use cache annotations to save, update, delete data into Redis cache. Let’s move and complete this last step.
Create Service class with Redis cache Annotations
StudentService.java
package com.javadream.SpringbootRedis.service;

import java.util.HashMap;
import java.util.Map;

import org.slf4j.Logger;
import org.slf4j.LoggerFactory;
import org.springframework.cache.annotation.CacheEvict;
import org.springframework.cache.annotation.CachePut;
import org.springframework.cache.annotation.Cacheable;
import org.springframework.stereotype.Service;

@Service
public class StudentService {

	private static final Logger logger = LoggerFactory.getLogger(StudentService.class);

	Map<Integer, String> studentMap = new HashMap<>();

	public StudentService() {
		studentMap.put(1, "Vasu");
		studentMap.put(2, "vishu");
		studentMap.put(3, "Raghu");
		studentMap.put(4, "Deepanshu");
		studentMap.put(5, "Koku");
	}

	@Cacheable(value = "students", key = "#rollNumber")
	public String getStudentByRollNo(int rollNumber) {
		logger.info("Fetching student details from studentMap for rollNo: "+ rollNumber);
	    return studentMap.get(rollNumber);
	}

	@CachePut(value = "students", key = "#rollNumber")
	public String updateStudentName(int rollNumber, String studentName) {
		logger.info("Updating user in database...");
		studentMap.put(rollNumber, studentName);
		return studentMap.get(rollNumber);
	}

	@CacheEvict(value = "students", key = "#rollNumber")
	public void deleteStudent(int rollNumber) {
		logger.info("Deleting student from cache...");
		studentMap.remove(rollNumber);
	}

	@CacheEvict(value = "students", allEntries = true)
	public void clearCache() {
		logger.info("All Cache Cleared...");
	}

}Code language: JavaScript (javascript)
Create controller class for exposing endpoint
StudentController.java
package com.javadream.SpringbootRedis.service;

import java.util.HashMap;
import java.util.Map;

import org.slf4j.Logger;
import org.slf4j.LoggerFactory;
import org.springframework.cache.annotation.CacheEvict;
import org.springframework.cache.annotation.CachePut;
import org.springframework.cache.annotation.Cacheable;
import org.springframework.stereotype.Service;

@Service
public class StudentService {

	private static final Logger logger = LoggerFactory.getLogger(StudentService.class);

	Map<Integer, String> studentMap = new HashMap<>();

	public StudentService() {
		studentMap.put(1, "Vasu");
		studentMap.put(2, "vishu");
		studentMap.put(3, "Raghu");
		studentMap.put(4, "Deepanshu");
		studentMap.put(5, "Koku");
	}

	@Cacheable(value = "students", key = "#rollNumber")
	public String getStudentByRollNo(int rollNumber) {
	    logger.info("Fetching student details from studentMap for rollNo: "+ rollNumber);
	    return studentMap.get(rollNumber);
	}

	@CachePut(value = "students", key = "#rollNumber")
	public String updateStudentName(int rollNumber, String studentName) {
		logger.info("Updating user in database...");
		studentMap.put(rollNumber, studentName);
		return studentMap.get(rollNumber);
	}

	@CacheEvict(value = "students", key = "#rollNumber")
	public void deleteStudent(int rollNumber) {
		logger.info("Deleting student from cache...");
		studentMap.remove(rollNumber);
	}

	@CacheEvict(value = "students", allEntries = true)
	public void clearCache() {
		logger.info("All Cache Cleared...");
	}

}
Code language: JavaScript (javascript)
Explanation of controller class code
In the controller class we have created four endpoints. These endpoint are
| GET | http://localhost:8080/student/{rollNo} | This endpoint is used to get student details by providing rollNo. On First call we get data from Database after that it’s fetch from Redis cache. |
| PUT | http://localhost:8080/student/{rollNo} | This endpoint is use to update student name for specific student by providing rollNo in database and cache. |
| DELETE | http://localhost:8080/student/{rollNo} | This endpoint is used to delete record of student from database and cache. |
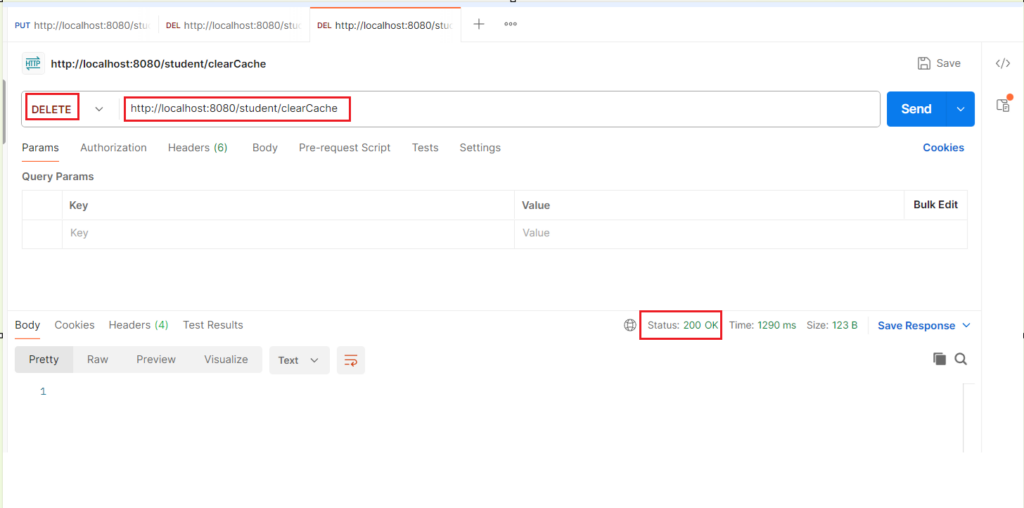
| DELETE | http://localhost:8080/student/clearCache | This endpoint is used to clear the complete cache. |
Explanation of Service class code
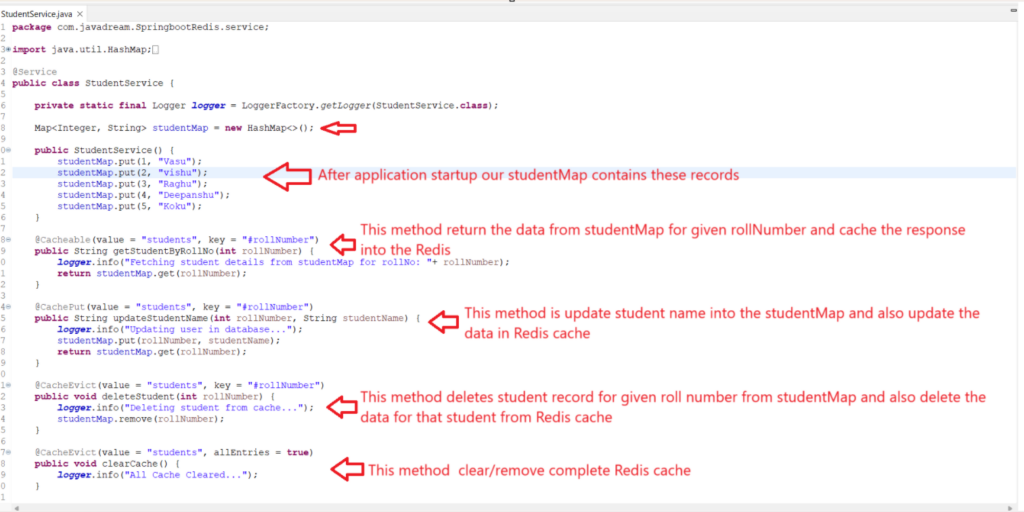
As already mentioned in this example we are using HashMap to fetch data. You can use the same or you can use any of the database. We have created a HashMap named studentMap, Where key is rollNo and value is student name.
In the class constructor we are putting some value into the sudentMap. So when we run our application at the time of class load all these details are set into the studentMap and this map behave as database for this example.
Value and Key parameter
We are seeing value and key parameter in each cache annotations. These two are the most important parameter for cache. Value parameter is used to define the name of the cache where data is stored in the Redis cache. This is the mandator parameter and used to define a single name or we can also provide multiple name.
In this example we are using value as student. So our data is cached into the Redis cache with name student.
@Cacheable(value = "students", key = "#rollNumber")Code language: CSS (css)Suppose if you want to define multiple name so you can use {} for value parameter.
@Cacheable(value = {"students","javadreamstudent"}, key = "#rollNumber")Code language: JavaScript (javascript)Another parameter is key. It’s the optional parameter but the most important one. We must use this parameter because it’s define how data is identified inside the cache. In this example we are using key=”#rollNumber”. It means it’s cached the data on the basis of rollNumber parameter. If we do not use this parameter and only use value parameter than data is stored on the basis of all the parameters defined in the method.
Note: Please make sure whatever name you are given to your key parameter it should be present in your method parameter list. If it’s not present you ‘ll get java.lang.IllegalArgumentException exception
This one is fine
@Cacheable(value = "students", key = "#rollNumber")
public String getStudentByRollNo(int rollNumber) {Code language: CSS (css)
If we do not pass same name you ‘ll get java.lang.IllegalArgumentException
@Cacheable(value = "students", key = "#studentId")
public String getStudentByRollNo(int rollNumber) {Code language: CSS (css)

this error comes because we are using SpEL(Spring expression language) with key parameter using #. So spring expects this parameter to be same as valid parameter present in method definition. So make sure you define key with the same name that present in your method parameter list.
Test the code
Before testing the code let’s look for some basic commands of Redis that you can run on redis-cli and check the result of Redis server. Please refer the below table for basic Redis commands.
Basic Redis Commands
| KEYS * | It displays all the cached keys. |
| GET <key> | It is used to display the value of particular cached key. |
| TYPE <key> | It tells the data type of cached key data for example String, Int etc. |
| TTL <key> | It tells TTL(Time To Live ) of cached key. In other term it defined the time limit for a key staying in Redis cache. After this time it ‘ll automatically remove. |
| DEL <key> | It is used to delete a particular cached key data. |
| FLUSHALL | It use to clear complete cache. |
So before starting the application lets use KEYS * command on your Redis-cli. This command return all the keys that are cached. So till now we haven’t cached any key so we should get an empty list in the response.

In this example we have create four endpoints let’s discuss them one by one.
1- http://localhost:8080/student/{rollNo} => GET
This url is use to get the name of the student by passing the rollNo. This is a GET request so if we pass the rollNo, it ‘ll fetch the student name from the studentMap and return. For example in our example our student map contains five records. Below is the screenshot for your reference.

So if we pass rollNo as 2. We should get vishu as response. As student name for rollNo 2 is vishu. After getting the response go to Redis-cli and run the command KEYS *. You ‘ll get one record as response list.


One query you are getting in mind. That how do we ensure that our data is coming from Redis cache and not from database. So for this we have put the log in our service class. So first time when it ‘ll query database in our case it fetch from studentMap, So it ‘ll print the log on console but next time when you call the same URL you can see that log ‘ll not printed on console because data is coming from the redis.

Now try to call for another rollNo. It ‘ll print the log on console and after the call if you call next time the log ‘ll not printed because it’s coming from cache. Let’s try for rollNo 3.


You can see on your Redis-cli console what value cached in these keys. use the GET command with following the key name. For example follow below screenshot.

NOTE: One thing you need to note down is that whatever we return as a response from our endpoint those value cache on Redis. For example in the endpoint we are returning the name of the student. So the name is cached. If you return any other thing like any custom response or whatever as per your logic that value ‘ll be cached.
2- http://localhost:8080/student/{rollNo} => PUT
This is the second endpoint that we expose. This is a put request. And if we see this controller calls the updateStudentName method of StudentService class. This method is use to update cache data. For example we have already cached the student name of rollNo 2. If we see the Redis-cli for rollNo 2 we have name as vishu there. CachePut annotation helps to update cache data. We have our service class method with this annotation.


Now if we want to update our studentMap in your case it might be database update also. After update whatever you return it ‘ll update the cached. Let’s say we want to update student name for rollNo 2 from vishu to javadream or any other name. Just call the this endpoint and check redis-cli you ‘ll get the updated data.


3- http://localhost:8080/student/{rollNo} => DELETE
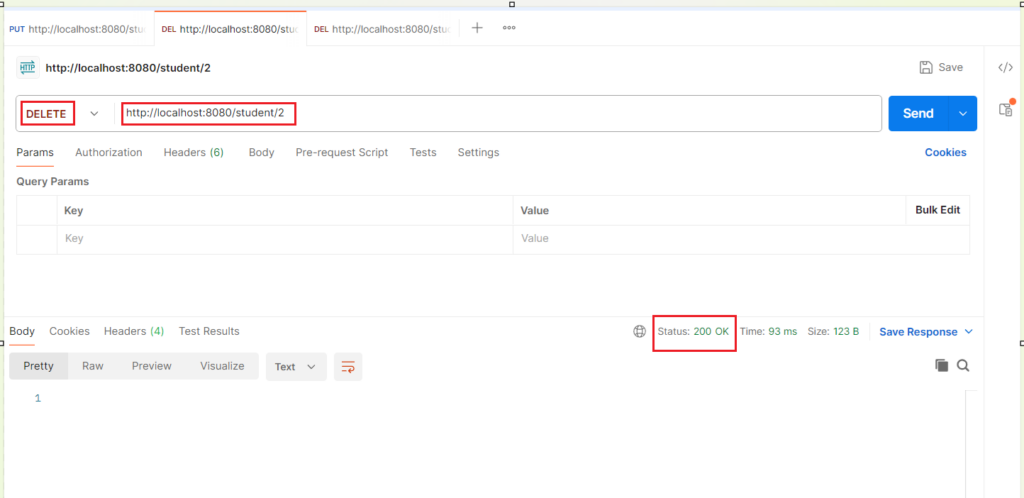
This is the third endpoint that we expose. This endpoint is use to delete the particular redis key data. As we are using rollNo as key so if we want to delete any data for particular rollNo. We ‘ll call this API. data is deleted because of @CacheEvict annotation on the service class. Let’s delete cache data for rollNo 2. Call the delete API with rollNo2 and after you getting 200 OK respponse check the Redis-cli for confirmation.


4- http://localhost:8080/student/clearCache => DELETE
This is the last endpoint that we expose. This endpoint is use to clear all cache data from Redis cache. The same annotation CacheEvict is use to delete the cache data. But with this annotation we need to pass the allEntries parameter with value as true. allEntries true means it ‘ll delete the all keys that are cached from Redis.

