In this blog we ‘ll discuss about Spring Boot Docker integration. We ‘ll learn how we can containerize our spring boot application. If you are doing coding very long time so you must know this line that. It’s working on my computer don’t know what’s the issue on your system 😂. And joke is that we can not give our computer to client. Jokes apart we have seen this situation that we developed a application and it’s working on our system, but when we share with QA for testing it’s not working there.
Mostly it’s some configuration issue that we have to take care explicitly and sit with QA to configure their system with required configuration, So that they can test the application. Docker comes as hero here to solve these kinds of problem. Docker is a kind of tool that helps us to package our application and everything it needs into the container.
Container is like a lightweight portable box. Where application run same everywhere like on laptop, server and any cloud environment and solve the problem that this application is not working on my system. It’s time to see how can we containerize our spring boot application.
Containerize Spring boot application
We have already discuss what problem docker solves for us. Now we ‘ll see how we can use docker in our spring boot application. And how docker helps us to create the docker image of our spring boot application. We ‘ll also see how this docker image can be run on everywhere.
First of all we have to download docker in our system. You can take an online reference to install docker on your system. Once you install docker on your system you can run the below command to check that is docker successfully installed or not.
docker -vRun the above command in your command prompt and if you get the result means you have installed docker successfully. but if no output come means, there is some issue while installing docker you need to fix this just take reference on any blog to fix installation issue. Above command display the docker version, Your output for above command must be like below screenshot.

Till here we have our docker installed, Let’s see how we can containerize our spring boot application using docker. It’s a very simple process we just have to create a file with name Dockerfile in our spring boot application root directory. Make sure that file name must be Dockerfile. Inside this file we ‘ll write some docker commands that helps us to containerize our application.
Project Description
Let me explain what we are going to do in this example. We ‘ll create a simple spring boot application, We expose a simple GET rest endpoint with some dummy response. After this we create the Dockerfile and see how to create docker image of this spring boot application.
Let’s start coding now.
Project structure
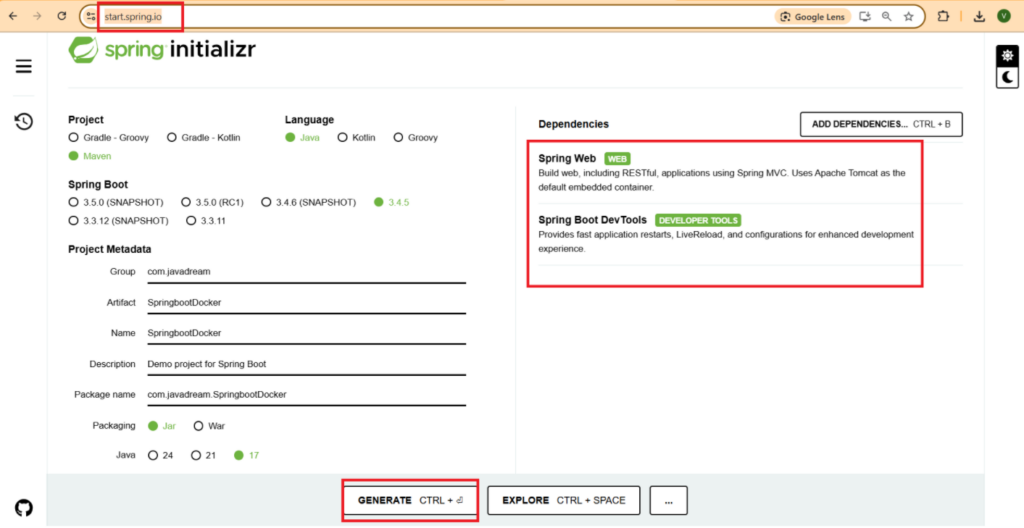
We are using Spring Initializr to create our project you can use the same process like ours or create by any IDE you like. Take the below screenshot for reference for creating the spring boot project.
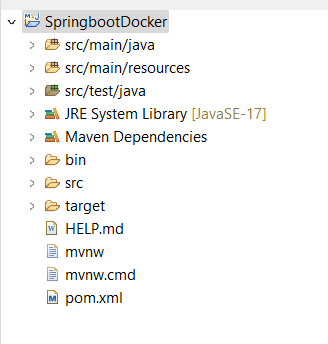
Now import this project in your favorite IDE. We are using the eclipse IDE and the project structure is look like below screenshot.
Docker Integration
We have created the spring boot application. Now as we mentioned in our Project Description section, We ‘ll expose a simple GET rest endpoint. And create a Dockerfile to containerize our spring boot application.
Let’s create a controller class to expose a GET rest endpoint with a dummy response.
DockerController.java
package com.javadream.SpringbootDocker;
import org.springframework.web.bind.annotation.GetMapping;
import org.springframework.web.bind.annotation.RestController;
@RestController
public class DockerController {
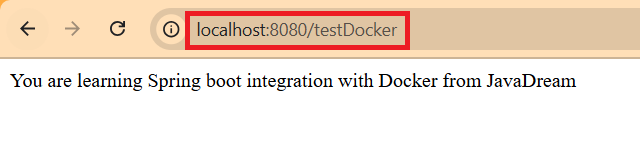
@GetMapping("/testDocker")
public String docker() {
return "You are learning Spring boot integration with Docker from JavaDream";
}
}
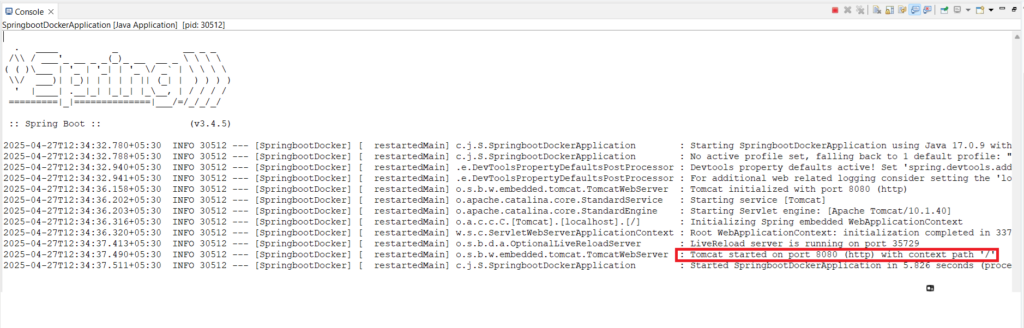
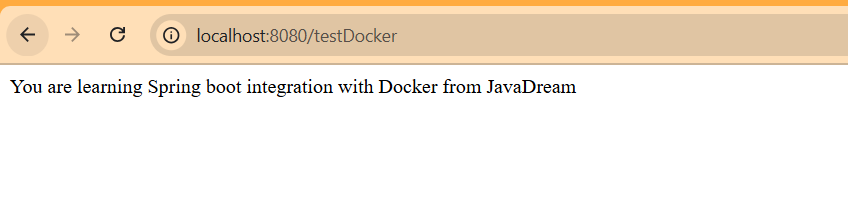
Code language: CSS (css)Now we have created the controller class and also exposed a GET rest endpoint. Now just test that your application is running fine or not. Just run you spring boot application and try to access the GET endpoint that we created.
Our application is running fine now it’s time to create a Dockerfile and containerize our application.
Dockerfile
Create a Dockerfile in your spring boot application root directory. We just need to define few docker commands and that’s it. Look how easy it is. Let’s start and see.
Below is the project structure after creating Dockerfile.
Before deep dive into Dockerfile. First build our spring boot project to see what’s the name of jar of our project after building it. As we are using maven, You can use the below maven command to build your project or take help of IDE to build it.
mvn clean install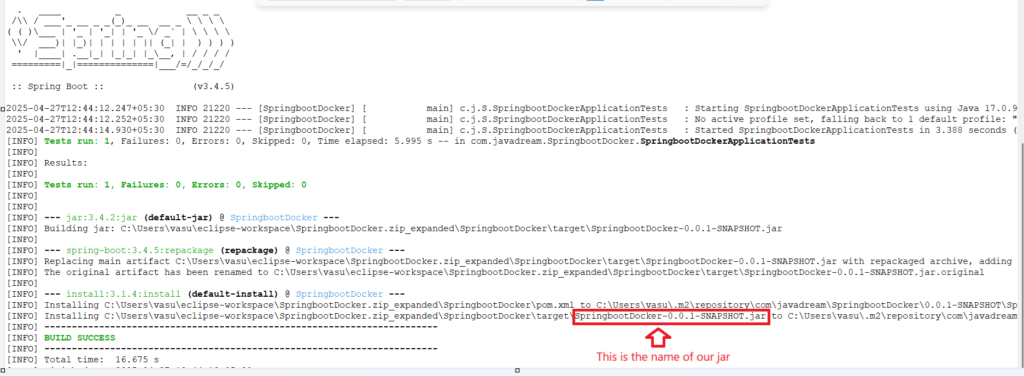
See your project jar name once build completed. This name is important because we use the jar name in our Dockerfile. Let’s see our Dockerfile now.
Open the Dockerfile that we created in our spring boot project root directory. And put the below docker commands in that.
FROM openjdk:17-jdk-slim
WORKDIR /javadream
COPY target/SpringbootDocker-0.0.1-SNAPSHOT.jar javadream.jar
ENTRYPOINT ["java", "-jar", "javadream.jar"]Code language: JavaScript (javascript)
Create Docker Image
We are almost done. We did everything that is required to containerize our spring boot application. Now we have to use some docker commands to create docker image of our project. Let’s see that in details.
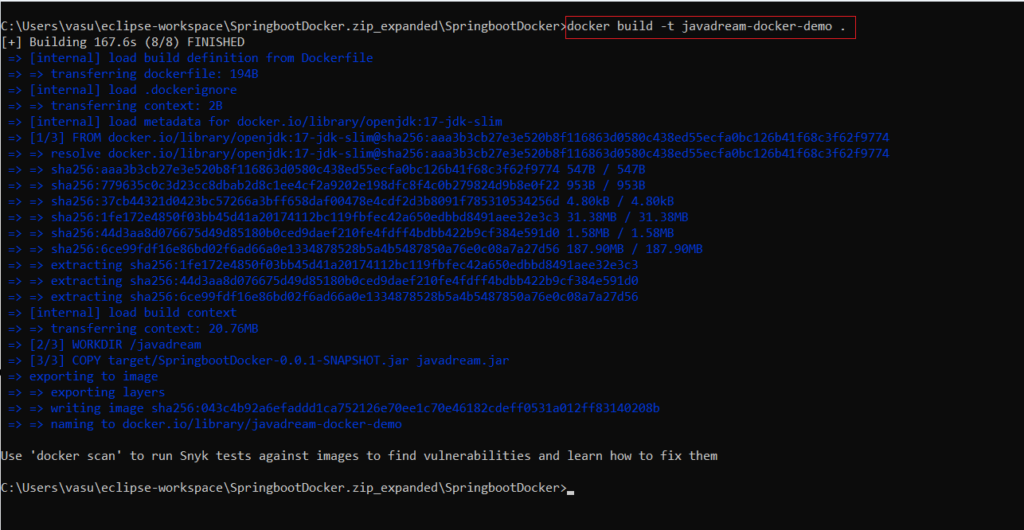
Goto your project directory and open project in command prompt. Use below command to create docker image.
docker build -t javadream-docker-demo .Need to observe two things in above command
-t stands for tagging image. Like we are using -t and giving the name as javadream-docker-demo. A docker image with the given name ‘ll be created. As we are not mentioning any tag here so by default tag become the latest. We ‘ll explore docker tag later in this post.
. stands for current directory. Means the root directory where our Dockerfile present.
Verify Docker Image
You have seen that docker build command is use to create the docker image. It reads the docker instructions defined in Dockerfile and executes them. If all goes good like above screenshot means docker image of the project has been created successfully. To verify run the below docker command in your command prompt.
docker images
You can see that a image with name javadream-docker-demo has created. We can run this image anywhere. And you can say now that use this docker image, if anyone (Mostly QA) try to say you that application is not working on my system 😂.
Run Docker Image
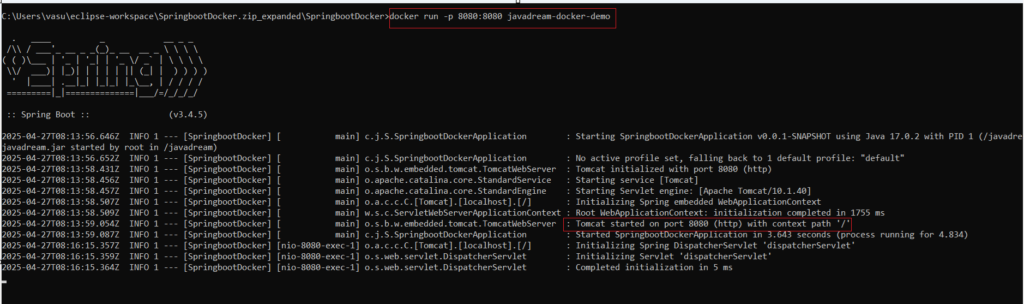
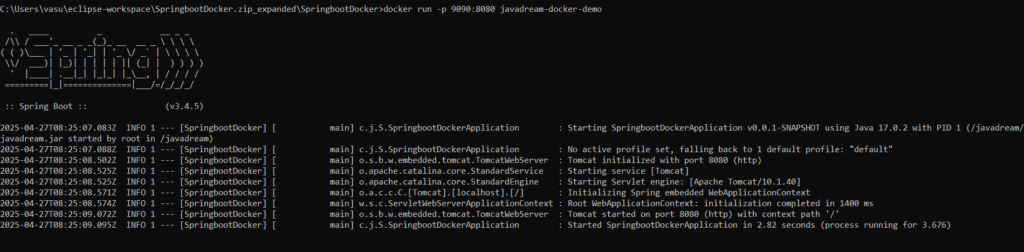
It’s time to run this docker image and validate if it’s working or not. To run this docker image we have to run the below command in our command prompt.
docker run -p 8080:8080 javadream-docker-demoCode language: CSS (css)Let’s break down above command for understanding.
-p is use to define port. And the port are in the below formate.
-p <system-port>:<container-port> <image-name>Code language: HTML, XML (xml)First port define is for our system. Means on which port we want to run this application. Like we have given 8080 means to access our application we have to use the URL http://localhost:8080/testDocker. If you want to run on some other port just change it like -p 9090:8080 then your application ‘ll be available on port 9090 and the URL ‘ll be http://localhost:9090/testDocker.
Second port is the Port inside the container where your Spring Boot app is running. It’s the port that use by the container. By default spring boot run on port 8080 so container port by default is 8080. If we want to change container port then we have to make sure that our spring boot application is also running on that port. Means we have to define server.port property in applications.properties file of our spring boot project or need to pass this server.port via env variable while running docker.
| system-port | Local System port. Just change and access application on that port. |
| container-port | Make sure you use server.port spring boot properties if want to change container-port. Whatever port you define for server.port , container-port should be same also. |
Third parameter is the image name. Define the image name of your project here.
Run the command in the command prompt and try to access your application.
Let’s try to change system port and see whatever we have mentioned above is working or not. Just press Control + c on you terminal to stop docker. And change the port and validate.

Run Docker Image in Detached Mode
If you see when we apply the docker run command, By default, the terminal stays attached to the container (showing logs). And simply pressing Control + C we can stop our container. But what if we don’t want it instead we want that our docker run in background without showing the logs. For this we use -d in our run command.
-d stands for detached mode. Means it’s run our container in background. Let’s see how it works. Run below command in your command prompt.
docker run -d -p 8080:8080 javadream-docker-demoCode language: CSS (css)
After running above command we ‘ll get one id in response like above screenshot. This is our container id. we can validate that if our container is started or not using below command.
docker run -d -p 8080:8080 javadream-docker-demoCode language: CSS (css)
Try to access your GET rest endpoint on browser you must be able to access that.
See logs of docker container
If you noticed while we run our application in detached mode we are not seeing any logs on the screen. It’s because our application is running in background. And we got one container id when we run the application in detached mode. If you forget that id you can run the below command to see all running containers details.
docker psThis command display all the running container along with their id.

Now to see the logs of our container we have to use the below command by giving our container id.
docker logs 1409ae6a862f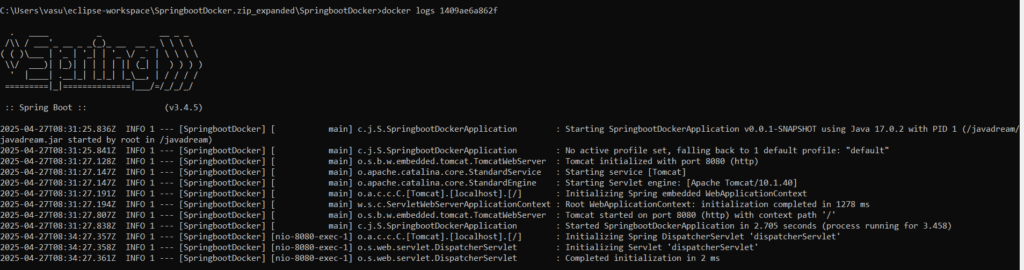
You noticed that we get all the logs. But it’s terminate after displaying the current logs. So if we want to tail the live logs we have to use the -f flag on the above command. Just run the below command in your terminal and see the difference.
docker logs -f 1409ae6a862f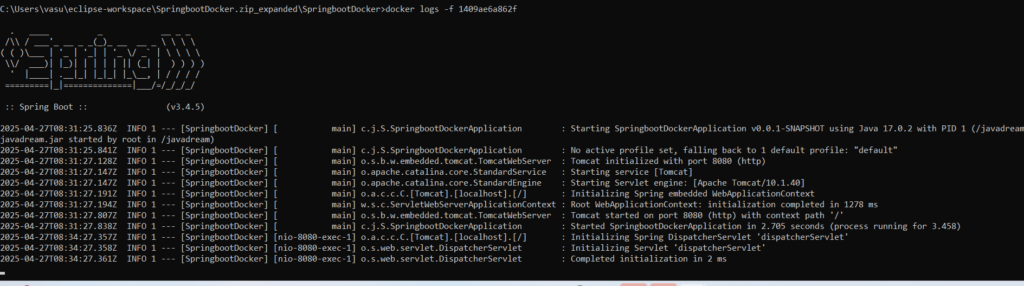
Stop Docker container running in detached mode
As container is running in background so we can’t simply stop this container by pressing Control + C. If we want to stop our container we have to run the below command.
docker stop 1409ae6a862f1409ae6a862f is the container id. Replace with your container id. To verify you can check your GET rest endpoint it ‘ll not give any response. Or you can run the below command. You ‘ll not get your container details here as you have stopped your container.
docker ps
Tag Docker Image
Tagging is like versioning or labeling of the image. It’s mainly use to identify different versions of the same docker image. For example when we create our image if we don’t specify any tag name, by default tag name become latest. To Keep track of our release we use this tag. Like we release application first time so we can tag our image like version_0. Next time when we introduce any feature we can increase this tag number like version_1, version_2 etc. These tag names up to you whatever tag name you want to give you can.
Below is the syntax of the docker tag command.
docker tag <source_image>:<source_tag> <target_image>:<target_tag>Code language: HTML, XML (xml)We have already created our image for this project. And we haven’t define any tag at that time. So by default it became latest. Use docker images command to display the list of all docker images.

Now if you want to tag it. You can use the above syntax for tag the image. Follow below command
docker tag javadream-docker-demo:latest javadream-docker-demo-tagged:v1Code language: CSS (css)Here we have tagged our image with v1 tag. To verify that image tagged or not you can use docker images command. And you ‘ll see images with both tags. Image is same only tag is different.


Push Docker image to DockerHub
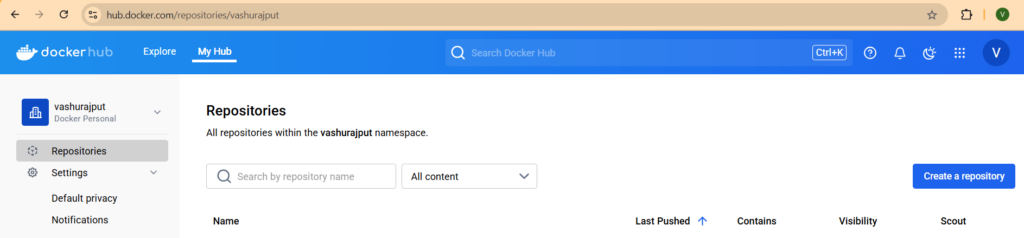
We have done everything it’s time to push our image to DockerHub. So anyone can access to our image. Make sure that you have your account created on Docker.
If you don’t have docker account first go to this link https://hub.docker.com/ and create your account. After login you ‘ll see the screen like below screenshot.
To push the image to dockerhub you first need to login into dockerhub from your terminal. Use below command to login from terminal.
docker loginIt ‘ll ask your credentials. Just provide that and you ‘ll be logged-in to the dockerhub. Follow below screenshot for your reference.

Once you login successfully you can push your image to the dockerhub. Before pushing we have to tag the docker image in below format.
<dockerhub-username>/<repository-name>:<tag>Code language: HTML, XML (xml)So tag it in this format first. If you directly try to push your image you ‘ll get the error like below screenshot.

So we must have to tag the image in given format first then only we can push our image to dockerhub. Below command do the tagging in required format.
docker tag javadream-docker-demo-tagged:v1 vashurajput/javadream-docker-demo-tagged:v1
Now we can push our image using docker push command. Below is the command for pushing our image.
docker push vashurajput/javadream-docker-demo-tagged:v1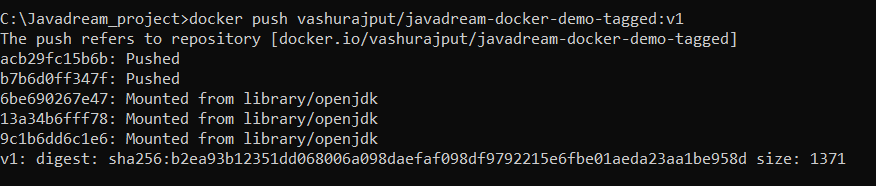
We can see that image has been pushed successfully. For verifying it you can go to DockerHub portal and refresh the page. You ‘ll see the pushed image details there.

You can see the image name there. Just look at visibility it’s public. This means anyone can access this image. If you are working on any organization this must be private.
Pull Docker image
Now as a developer you have completed your task. Now it’s time for the QA to test your application. And now you don’t want him to say that this is not working on my system 😂. So tell him use the below command to pull the docker image and just use docker run command like we mentioned above while we were running our docker image. As our image name is javadream-docker-demo-tagged and the version is v1. So the pull command ‘ll be like below.
docker pull vashurajput/javadream-docker-demo-tagged:v1Note: Make sure you define the tag at the end else it ‘ll download the image with latest tag.
Once pull completed you can use docker images command to see the image. And after that use docker run command to start the application
Note: This is the public image so you can directly pull it. But suppose if your organization have private repo then you have to first login using docker login command on your terminal then only you can pull the image.
Logout Docker
After pushed the image to the dockerhub if you want to close the session from your terminal, means if you want to logout from your local docker you can use the below command.
docker logout
Download complete example from GitHub
Hope you enjoy this blog. If you like this blog please share this with your friends and also please share your feedback in our comment section. If you need a blog on specific topic please comment on our comments section below. We ‘ll try our best to help you.