In this blog we ‘ll learn about spring boot jwt. Hope you like our previous blog on spring boot security basic authentication. If you haven’t check this and want to learn or brush-up your knowledge on spring boot security basic authentication you can checkout our blog on spring-boot-3-security. Let’s continue with JWT. JWT stands for JSON Web Tokens. This token is use to access the secured resources data in spring application. As we know spring boot API are stateless means it doesn’t maintains the session. Each call to API is treated as new call. So does this means in each and every call we have to authenticate the user by passing his or her credentials.
No, As passing credentials in every request is not a good approach. So to overcome this type of scenario in stateless API’s call, JWT(JSON Web Token) comes into the picture. So the process is like in first call the user sends his credentials username and password to the login API and if the user is valid we generate the JWT token and send it back to the client application. Client application must have to pass this JWT token in every request header.
So whenever your client application calls any secure endpoints of spring boot application. We extract the header and look for the JWT token. After extracting it we ‘ll validate this JWT token if it’s valid we process the method execution and return the data to the client application and if this JWT is invalid we return 403 code (Forbidden code) to the client application.
We can say that after authentication of the user this JWT token is the one who helps you to access the protected resource. Let’s understand some basics about JWT.
If you just looking for code you can directly jump into the code on GitHub
What is JWT
JWT stands for JSON Web Token. In simple terms if we explain JWT, So we can say that JWT is use to transfer information between two parties. JWT is use for authentication and authorization in web applications. Like we explained above after we authenticate our user spring boot application create a jwt token and return it to the client application. So if client application want to access any secured endpoint they need to pass this JWT token in header while they call the secure endpoint.
JWT token divided into three parts by two dots (.) let’s understand in more details. Below is the three parts
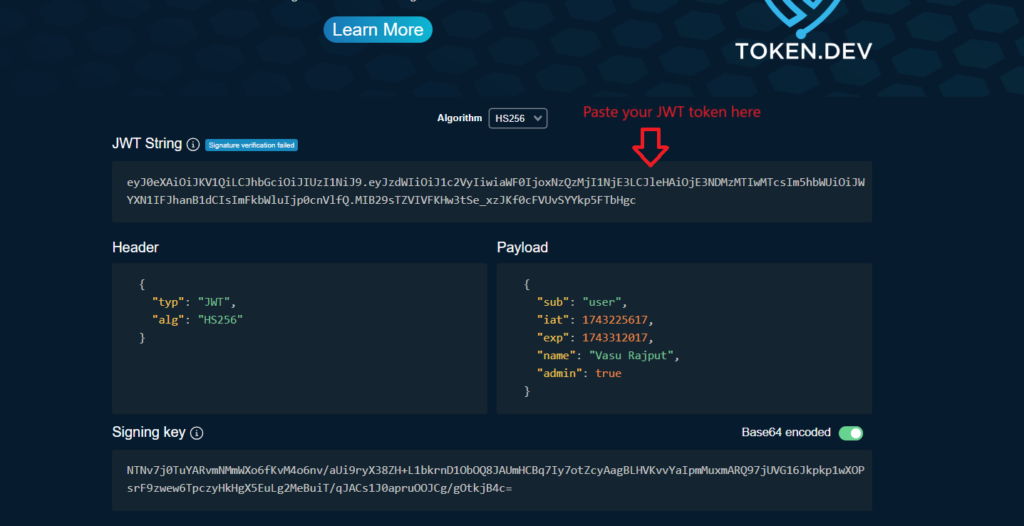
<Header>.<Payload>.<Signature>Code language: HTML, XML (xml)If you haven’t see JWT token before. You can visit this link https://token.dev/ and see how JWT token looks like and what these three parameters contains. This website is use to validate tokens. if you have any JWT token you can paste that in this website inside JWT String. Only if your JWT token is valid you can see the information about the token, Else If it’s not valid an error ‘ll be generated for the JWT issue. Try to play on this website with your JWT token.
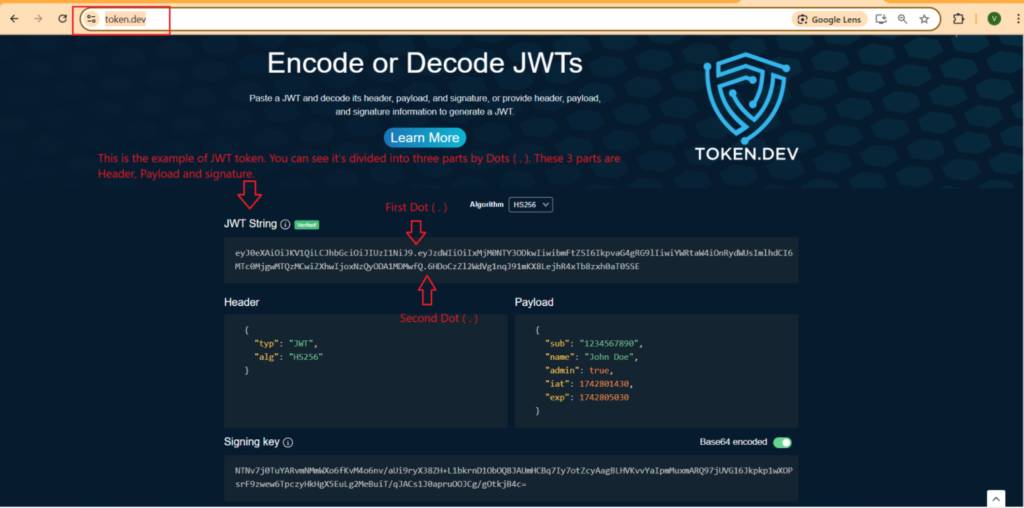
Generally JWT is use for stateless application. Stateless application means your application doesn’t know you, every call from client is a unique call. If you remember old days when we use Tomcat and on first call we provide user credentials username and password. If credentials are valid Tomcat create the session for the current client and generate a session-id and return to the client. After this client send this session-id in every call in cookies and Tomcat check this session-id and establish the session.
Problem JWT solves
We are living in modern world now. Everyone is using the microservice architecture. Microservice are often stateless because multiple instances of a microservice runs, And we are not sure our call is handle by which instance of the microservice. So how do our microservice identify that you are the valid user before returning the response.
Here JWT comes into the picture. In first call client has to send his credentials username and password. If credentials are valid our spring boot application generates a JWT token and return to the user. After this client sends this JWT token in header as Bearer token. And in our security configuration class we validate the client call we extract the bearer toke from request header and validates it. If it’s valid we pass the call to the controller otherwise return the 403 forbidden error to the client.
When we running multiple microservices and multiple instances of that. We use API gateway there. All the calls to microservices are routed by the API gateway. So we plugged our JWT validation logic on gateway so whenever calls come, it go to API gateway. Gateway validates the call by checking JWT token. If token is valid then it ‘ll pass the call to requested microservice endpoint else if not valid return with 403 error. We ‘ll cover API gateway example in our next blog.
As here we are using only one microservice with one instance so we kept the logic inside JwtAuthFilter class so when calls come this filter class extract the JWT token and validate if valid pass it to endpoint else return 403.
Example Explanation
Let’s see what we are going to build in this example. We ‘ll create a simple GET endpoint and return a simple string as a response. But this GET endpoint ‘ll be restricted means this endpoint is secured and until and unless we provide the valid JWT token we ‘ll not be able to get the response from this GET endpoint.
For example we ‘ll create a class Student and expose the endpoint /student/info. This ‘ll be the secured endpoint and only valid user ‘ll get the response. Below is the class where we are exposing this endpoint.
package com.javadream.SpringbootJwtExample.controller;

import org.springframework.web.bind.annotation.GetMapping;
import org.springframework.web.bind.annotation.RequestMapping;
import org.springframework.web.bind.annotation.RestController;

@RestController
@RequestMapping("/student")
public class StudentController {

	@GetMapping("/info")
	public String test() {
		return "Hello from Student info API. You are getting the response because you provided the valid JWT token";
	}

}Code language: CSS (css)
We ‘ll secure this endpoint by customizing the security config class so only valid user can get the response. You ‘ll see all this step by step, here we are just giving the explanation like what you are going to build. It ‘ll give you the context about spring boot security using JWT token so you can use this security feature as per your project requirement.
Let’s start coding now.
Project Structure

This is the final project structure looks like. Let’s start and create a Spring boot project and add the below dependency in your pom.xml file.
<dependency>
   <groupId>org.springframework.boot</groupId>
   <artifactId>spring-boot-starter-security</artifactId>
</dependency>

<dependency>
   <groupId>org.springframework.boot</groupId>
   <artifactId>spring-boot-starter-web</artifactId>
</dependency>

<dependency>
   <groupId>org.springframework.boot</groupId>
   <artifactId>spring-boot-devtools</artifactId>
   <scope>runtime</scope>
   <optional>true</optional>
</dependency>

<!-- JWT Dependency -->
<dependency>
   <groupId>io.jsonwebtoken</groupId>
   <artifactId>jjwt-api</artifactId>
   <version>0.11.5</version>
</dependency>

<dependency>
   <groupId>io.jsonwebtoken</groupId>
   <artifactId>jjwt-impl</artifactId>
   <version>0.11.5</version>
   <scope>runtime</scope>
</dependency>

<dependency>
   <groupId>io.jsonwebtoken</groupId>
   <artifactId>jjwt-jackson</artifactId>
   <version>0.11.5</version>
   <scope>runtime</scope>
</dependency>Code language: HTML, XML (xml)
After adding these dependency in pom.xml file. We just create the controller class for exposing the endpoint. As explained above we ‘ll create a controller class and expose the /student/info endpoint. And we ‘ll make this endpoint secure by customize our security config class. Let’s see the controller class for exposing the endpoint.
StudentController
package com.javadream.SpringbootJwtExample.controller;

import org.springframework.web.bind.annotation.GetMapping;
import org.springframework.web.bind.annotation.RequestMapping;
import org.springframework.web.bind.annotation.RestController;

@RestController
@RequestMapping("/student")
public class StudentController {

	@GetMapping("/info")
	public String test() {
		return "Hello from Student info API. You are getting the response because you provided the valid JWT token";
	}

}Code language: CSS (css)
Now secure this endpoint so nobody can access this directly. For this we are going to create the SecurityConfig class where we restrict this endpoint. Let’s look at the code of this class.
SecurityConfig
package com.javadream.SpringbootJwtExample.config;

import org.springframework.context.annotation.Bean;
import org.springframework.context.annotation.Configuration;
import org.springframework.security.authentication.AuthenticationProvider;
import org.springframework.security.config.annotation.web.builders.HttpSecurity;
import org.springframework.security.config.annotation.web.configuration.EnableWebSecurity;
import org.springframework.security.config.http.SessionCreationPolicy;
import org.springframework.security.web.SecurityFilterChain;
import org.springframework.security.web.authentication.UsernamePasswordAuthenticationFilter;

import com.javadream.SpringbootJwtExample.filter.JwtAuthFilter;

@Configuration
@EnableWebSecurity
public class SecurityConfig {

    private final JwtAuthFilter jwtAuthFilter;
    private final AuthenticationProvider authenticationProvider;

    public SecurityConfig(JwtAuthFilter jwtAuthFilter, AuthenticationProvider authenticationProvider) {
        this.jwtAuthFilter = jwtAuthFilter;
        this.authenticationProvider = authenticationProvider;
    }

	@Bean
	public SecurityFilterChain securityFilterChain(HttpSecurity http) throws Exception {
		http.csrf(csrf -> csrf.disable())
				.authorizeHttpRequests(
						auth -> auth.requestMatchers("/auth/**").permitAll().anyRequest().authenticated())
				.sessionManagement(session -> session.sessionCreationPolicy(SessionCreationPolicy.STATELESS))
				.authenticationProvider(authenticationProvider)
				.addFilterBefore(jwtAuthFilter, UsernamePasswordAuthenticationFilter.class);
		return http.build();
	}

}Code language: JavaScript (javascript)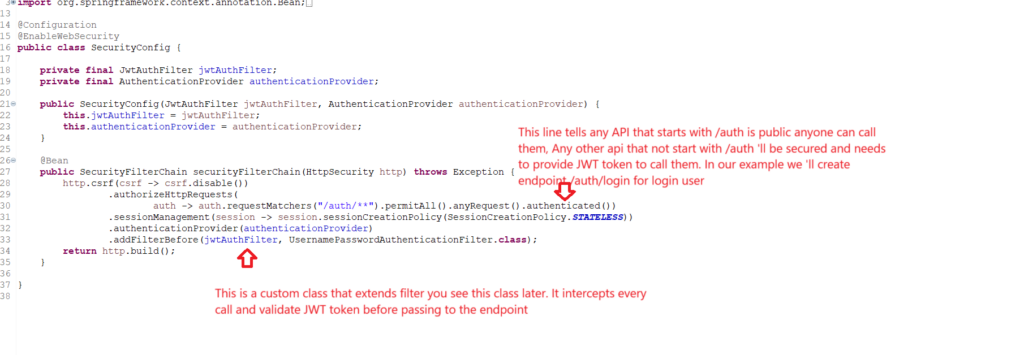
Explanation of SecurityConfig class
First thing we have to make sure that we use the @EnableWebSecurity annotation on class level. This annotation enables the spring security in our application. As it’s a configuration class we are using the spring annotation @Configuration.
After this you are seeing we are declaring two variables of class JwtAuthFilter and AuthenticationProvider. First one is the customs class and the later one is from spring security, that we look later. But for now just for understanding i am explaining these.
JwtAuthFilter is the class that extends the OncePerRequestFilter filter class and it use to filter every client incoming request, after this extract the JWT token from request header and validate that. If JWT token is valid, it passes client call to the requested controller else return from here itself and give 403 forbidden error. Let’s see the code for this class.
JwtAuthFilter
package com.javadream.SpringbootJwtExample.filter;

import java.io.IOException;

import org.springframework.beans.factory.annotation.Autowired;
import org.springframework.security.authentication.UsernamePasswordAuthenticationToken;
import org.springframework.security.core.context.SecurityContextHolder;
import org.springframework.security.core.userdetails.UserDetails;
import org.springframework.security.core.userdetails.UserDetailsService;
import org.springframework.stereotype.Component;
import org.springframework.web.filter.OncePerRequestFilter;

import com.javadream.SpringbootJwtExample.util.JwtUtil;

import jakarta.servlet.FilterChain;
import jakarta.servlet.ServletException;
import jakarta.servlet.http.HttpServletRequest;
import jakarta.servlet.http.HttpServletResponse;

@Component
public class JwtAuthFilter extends OncePerRequestFilter {

	@Autowired
	private JwtUtil jwtUtil;

	@Autowired
	private UserDetailsService userDetailsService;

	@Override
	protected void doFilterInternal(HttpServletRequest request, HttpServletResponse response, FilterChain filterChain)
			throws ServletException, IOException {
		String authHeader = request.getHeader("Authorization");
		String jwtToken = null;
		String username = null;

		if (authHeader != null && authHeader.startsWith("Bearer ")) {
			jwtToken = authHeader.substring(7);
			username = jwtUtil.extractUsername(jwtToken);
		}
                if (username != null && SecurityContextHolder.getContext().getAuthentication() == null) {
                        UserDetails userDetails = userDetailsService.loadUserByUsername(username);

                        if (jwtUtil.validateToken(jwtToken, userDetails)) {
                          UsernamePasswordAuthenticationToken authToken = new UsernamePasswordAuthenticationToken(
                          userDetails, null, userDetails.getAuthorities());
                          SecurityContextHolder.getContext().setAuthentication(authToken);
                }
        }
        filterChain.doFilter(request, response);

	}
}Code language: JavaScript (javascript)
AuthenticationProvider class is from spring security framework that helps to authenticates user credentials and return authenticated object if successfully validate else throw exception on failure for example user not found or invalid password.
You can see in code endpoints that starts with /auth are public means anyone can access this. So we create another controller class and expose the endpoint /auth/login. As it’s a open endpoint we can access this endpoint without any authentication. Let’s create this class.
AuthController
package com.javadream.SpringbootJwtExample.controller;

import org.springframework.http.ResponseEntity;
import org.springframework.security.authentication.AuthenticationManager;
import org.springframework.security.authentication.UsernamePasswordAuthenticationToken;
import org.springframework.security.core.userdetails.UserDetails;
import org.springframework.security.core.userdetails.UserDetailsService;
import org.springframework.web.bind.annotation.PostMapping;
import org.springframework.web.bind.annotation.RequestBody;
import org.springframework.web.bind.annotation.RequestMapping;
import org.springframework.web.bind.annotation.RestController;

import com.javadream.SpringbootJwtExample.model.AuthRequest;
import com.javadream.SpringbootJwtExample.util.JwtUtil;

@RestController
@RequestMapping("/auth")
public class AuthController {

	private final AuthenticationManager authenticationManager;
	private final JwtUtil jwtUtil;
	private final UserDetailsService userDetailsService;


	public AuthController(AuthenticationManager authenticationManager, JwtUtil jwtUtil,
			UserDetailsService userDetailsService) {
		super();
		this.authenticationManager = authenticationManager;
		this.jwtUtil = jwtUtil;
		this.userDetailsService = userDetailsService;
	}


	@PostMapping("/login")
        public ResponseEntity<String> login(@RequestBody AuthRequest request) {
        authenticationManager.authenticate(
                new UsernamePasswordAuthenticationToken(request.getUsername(), request.getPassword())
        );
        UserDetails user = userDetailsService.loadUserByUsername(request.getUsername());
        String token = jwtUtil.generateToken(user.getUsername());
        return ResponseEntity.ok(token);
    }
}Code language: JavaScript (javascript)
In the above AuthController class you are seeing that on the /auth/login endpoint we are expecting a AuthRequest as RequestBody. This class contains two variable username and password. Lets see that class first then we explain this AuthController class.
AuthRequest
package com.javadream.SpringbootJwtExample.model;

public class AuthRequest {
	private String username;
	private String password;

	public AuthRequest() {
		super();
	}

	public AuthRequest(String username, String password) {
		super();
		this.username = username;
		this.password = password;
	}

	public String getUsername() {
		return username;
	}

	public void setUsername(String username) {
		this.username = username;
	}

	public String getPassword() {
		return password;
	}

	public void setPassword(String password) {
		this.password = password;
	}
}Code language: JavaScript (javascript)
Explanation of AuthController class
In AuthController class we ‘ll expose the endpoint for login the user. This controller endpoint expect username and password and validates the user. If credentials are valid we ‘ll generate a JWT token and return as response else we ‘ll return 403 forbidden error.
In this class we are seeing on the top we are declaring some variable. The most important one is JwtUtil variable. JwtUtil is a class that is use to generate JWT token, validate JWT token etc. We can say all the JWT stuff are taking care by this class.
The other variable is for AuthenticationManager and UserDetailsService service class. As for this example we ‘ll hardcode the user credentials . You can choose same way for learning or use any database to integrate in this example. Only change is while we validate the credentials instead of hardcoding you have to fetch the details from database. That is the only change rest of the thing remains same.
We are creating a CustomUserDetailsService class where we are extending this UserDetailsService interface and overriding the loadUserByUsername method. This method is used to validate user credentials by providing username only. If you are choosing any database instead of hardcoding part just fetch the details from the DB. That is the only change you need to do if you are using any database else follow the same process like we are doing. Let’s see the code of CustomUserDetailsService class.
CustomUserDetailsService
package com.javadream.SpringbootJwtExample.service;

import java.util.Collections;

import org.springframework.security.core.authority.SimpleGrantedAuthority;
import org.springframework.security.core.userdetails.User;
import org.springframework.security.core.userdetails.UserDetails;
import org.springframework.security.core.userdetails.UserDetailsService;
import org.springframework.security.core.userdetails.UsernameNotFoundException;
import org.springframework.security.crypto.bcrypt.BCryptPasswordEncoder;
import org.springframework.stereotype.Service;

@Service
public class CustomUserDetailsService implements UserDetailsService {

	public CustomUserDetailsService() {
		super();
	}

	@Override
	public UserDetails loadUserByUsername(String username) throws UsernameNotFoundException {
		if (username.equals("user")) {
			return new User("user", new BCryptPasswordEncoder().encode("password"),
					Collections.singleton(new SimpleGrantedAuthority("ROLE_USER")));
		}
		throw new UsernameNotFoundException("User not found");
	}

}Code language: JavaScript (javascript)
Now it’s turn for main and most important class that is responsible for JWT stuff is JwtUtil. This class is responsible for generating JWT token and validating these. Let’s see the code first then we explain it’s functionality in details.
JwtUtil
package com.javadream.SpringbootJwtExample.util;

import java.security.Key;
import java.util.Date;

import org.springframework.security.core.userdetails.UserDetails;
import org.springframework.stereotype.Component;

import io.jsonwebtoken.Jwts;
import io.jsonwebtoken.SignatureAlgorithm;
import io.jsonwebtoken.security.Keys;

@Component
public class JwtUtil {

    private static final String SECRET_KEY = "sdfjwer9238r9hfsf92jfksnf8329jfksn92";
    private static final long EXPIRATION_TIME = 86400000;

    public String generateToken(String username) {
    	 Key secretKey = Keys.hmacShaKeyFor(SECRET_KEY.getBytes());
    	 return Jwts.builder()
    			 	.setHeaderParam("typ", "JWT")
    	            .setSubject(username)
    	            .setIssuedAt(new Date())
    	            .setExpiration(new Date(System.currentTimeMillis() + EXPIRATION_TIME))
    	            .claim("name", "Vasu Rajput")
    	            .claim("admin", true)
    	            .signWith(secretKey, SignatureAlgorithm.HS256)
    	            .compact();
    }

    public String extractUsername(String token) {
        return Jwts.parserBuilder()
                .setSigningKey(Keys.hmacShaKeyFor(SECRET_KEY.getBytes()))
                .build()
                .parseClaimsJws(token)
                .getBody()
                .getSubject();
    }

    public boolean validateToken(String token, UserDetails userDetails) {
        String username = extractUsername(token);
        return (username.equals(userDetails.getUsername()) && !isTokenExpired(token));
    }

    private boolean isTokenExpired(String token) {
        Date expiration = Jwts.parserBuilder()
                .setSigningKey(Keys.hmacShaKeyFor(SECRET_KEY.getBytes()))
                .build()
                .parseClaimsJws(token)
                .getBody()
                .getExpiration();
        return expiration.before(new Date());
    }
}
Code language: JavaScript (javascript)
Explanation for JwtUtil
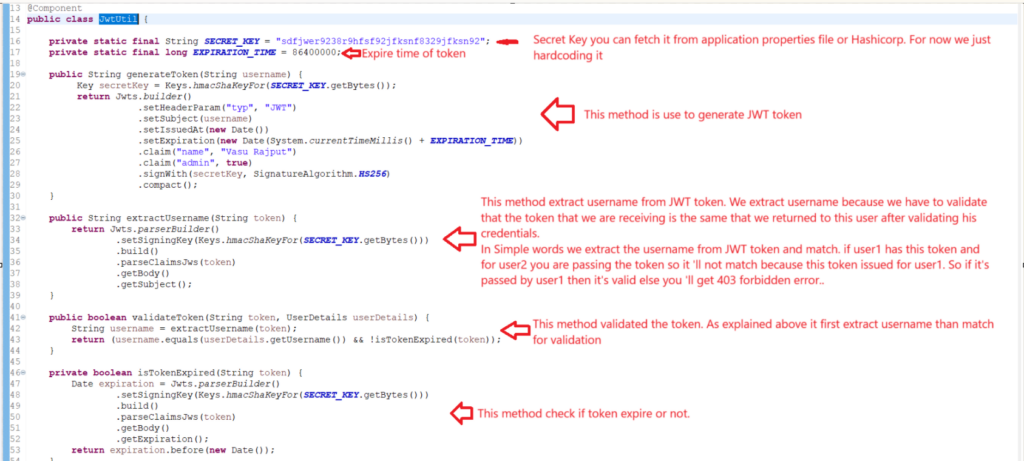
As mentioned JwtUtil is the most important class for this example. Because this class is use to generate, validate JWT token. Let’s understand this class functionality step by step.
First on class level we are initializing two global variable one is secret_key and other one is expiration_time. For this example we just hardcoded it here you can fetch this values from your application.properties file. And for production we do not expose our secret key publicly on application properties file. Because this secret key is used to sign our JWT token. So we have to store it in a secure place and fetch it. You can store it on Hashicorp or some other secret store tool. If you are not familiar with Hashicorp you can follow our blog and get depth understanding about this tool Spring boot Hashicorp Vault integration for storing secret.
Now after this we have declared a method called generateToken. This method expects a username and generate the JWT token. We expect username because we set the JWT subject to the given username to make sure that no other user can use this. Means in upcoming method you ‘ll see while we validate JWT token we extract the username first. So in simple terms use identity key of user like usename or userid while generating the JWT token.
This method contains some methods jargons(Refer to term in spring security). Let’s understand that.
| setHeaderParam | This set the header value of JWT token like it’s type of JWT. |
| setSubject | Set the subject of JWT as per given username. Make sure your username must be unique for each user or you can pass any unique attribute of user as per your business logic. |
| setIssuedAt | It’s define the time of JWT token generation. |
| setExpiration | It’s define the JWT expiry time. If token is expire and you try to access protected resource you ‘ll get 403 forbidden error. You need to generate new token and then call the protected resource. |
| claim | claim is use to set custom details. Like if you want to set any custom info to your JWT token like name of user. How many roles assign to this user or any other info that you want you can set in claims. |
| signWith | This is use to sign the JWT token with the SECRET_KEY defined along with the HS256 hashing algorithm. |
| compact | This is the final step use to to build a JWT token. It takes the JWT component header, payload, and signature—and combines them into a single compact string. |
You have understand all these methods of JWT. You can play with subject claims and set your details as per your business requirement. We ‘ll see all these details that we set once we generate the JWT token in testing step.
Other methods are as simple as their name. They use to validate and check the expiry time of JWT token. You can just go through this and understand. Now it’s time to testing our application let’s see if everything working fine or not.
Testing
It’s time to test our application. Lets run our application and try to access the protect resource.

Our application has been started. Let’s try to access the protected endpoint /student/info and see if you able to get the response or not. Open your postman application and test this API endpoint.
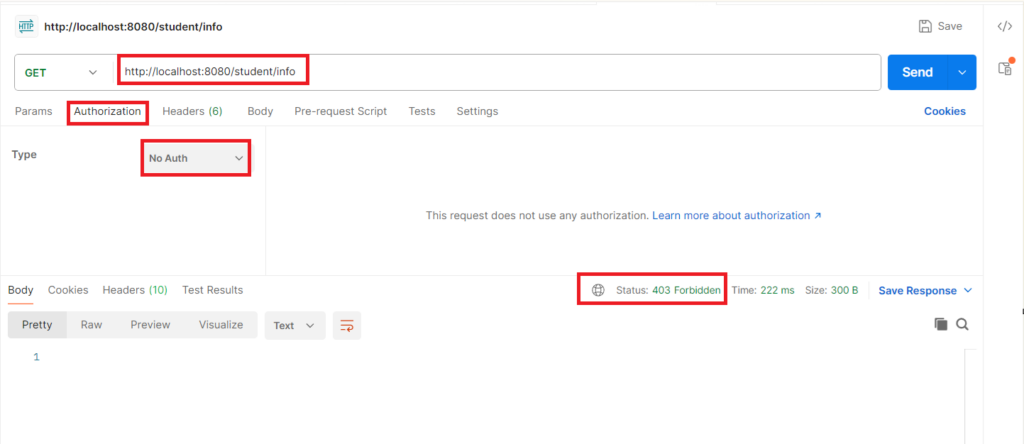
You can see we simply calls the /student/info endpoint with No authorization provided and we are getting 403 forbidden error. I am highlighting the Authorization tab because later we see how do we pass JWT token here. As we haven’t generated any JWT token yet and we are calling this protected resource that is why we are getting 403 error. Because we are not the valid user as of now.
Let’s generate the JWT token by providing our credentials to /auth/login endpoint. As we have hardcoded the username and password so we are passing the credentials whatever we set. You need to change accordingly if you are using any database or defined any other username and password. Let’s call the /auth/login endpoint. As it’s a public endpoint any one can call this API endpoint.
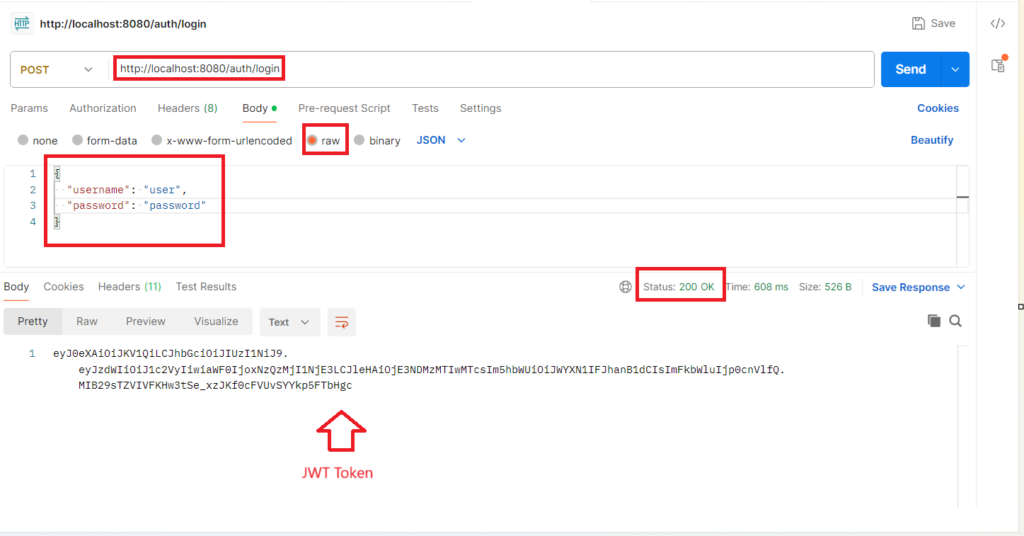
You can see after providing the valid credentials we are getting the JWT token as response. We have to use this JWT token if we want to access any protected endpoint. You know we have /student/info endpoint secured. Now let’s try to call that endpoint by passing this JWT token.
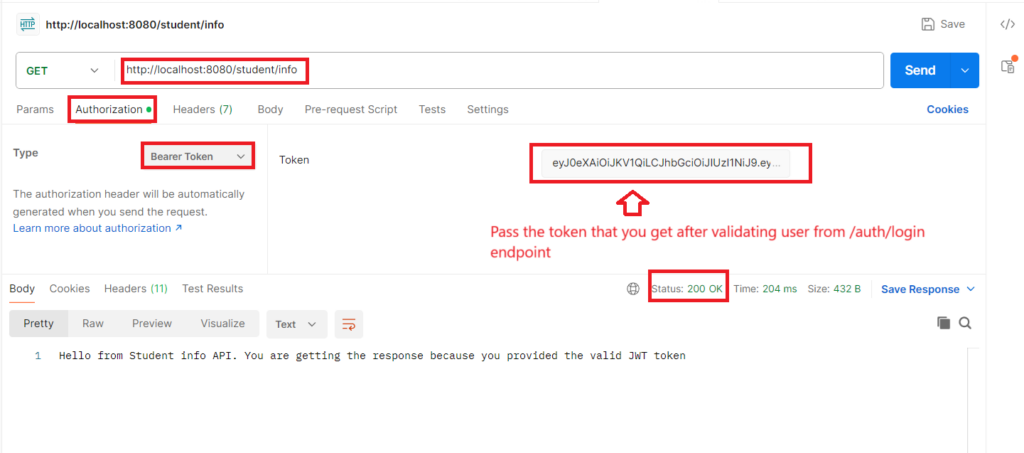
You can see that after providing the token we are able to get the response from the protected resource. Let’s play with this like provide any invalid string in token. Check scenarios like if you pass token after it expires. do all this thing and become expert in JWT.
If you want to see the value of your JWT token you can visit this https://token.dev/ website and paste your JWT token here. You can see If it’s a valid JWT toke or not. And it also shows you the details whatever you set in your JWT token.
Hope you enjoyed this blog. If you like this blog please share with others. Please share your valuable feedback on comment section. If you need a blog on specific topic please mention in comments we ‘ll try to create blog on specific topic.
Other blogs you may enjoy
Redis cache integration with Spring boot
Hashicorp Vault to store secret data of spring boot application